2. Mininet
In this chapter, we will briefly go over Mininet, a network emulator that utilizes standard Linux features to create OpenFlow compatible switches, links, virtual hosts, and controllers.
When you develop a mobile application, for example, you can utilize a mobile operating system emulator so that you do not have to purchase numerous physical hardware to test your code. Instead, the emulator provides an accurate reproduction of what your code will look like on those devices. Similarly, Mininet allows you to emulate and configure an entire network much like you would if you had an actual hardware setup. It is an ideal tool for learning about software defined networking.
| Chapter Details | |
|---|---|
| Chapter Goal | Explore the functionalities of Mininet |
| Chapter Sections | |
2.1. Getting Started with Mininet
In our labs, we will be using Mininet extensively to simulate different network scenarios. We can quickly deploy a small topology with a reference controller with the sudo mn command.
Step 1 Log-in to your slab environment:
$ ssh sdn@<slab-IP>
# password: rocks
...
sdn@slab:~$
Step 2 Run a simple Mininet command:
sdn@slab:~$ sudo mn
*** Creating network
*** Adding controller
*** Adding hosts:
h1 h2
*** Adding switches:
s1
*** Adding links:
(h1, s1) (h2, s1)
*** Configuring hosts
h1 h2
*** Starting controller
c0
*** Starting 1 switches
s1 ...
*** Starting CLI:
mininet>
Important
Notice that you are now in the mininet> prompt. If you exit out of this process, the corresponding switches, hosts, and controllers will be removed.
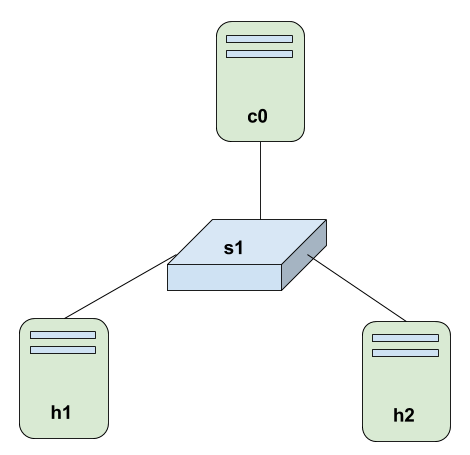
This command launches a simple 2 host, 1 controller, 1 switch topology. The following diagram outlines the topology.
Step 3 Run the help option to view the list of commands available:
mininet> help

Documented commands (type help <topic>):
========================================
EOF    gterm  iperfudp  nodes        pingpair      py      switch
dpctl  help   link      noecho       pingpairfull  quit    time
dump   intfs  links     pingall      ports         sh      x
exit   iperf  net       pingallfull  px            source  xterm

You may also send a command to a node using:
   <node> command {args}
...
Step 4 Take a look at the nodes we created with the simple Mininet command:
mininet> nodes
available nodes are:
c0 h1 h2 s1
You can freely interact with the hosts as if it were another Linux machine.
Step 5 View the network interfaces on h1:
mininet> h1 ifconfig
h1-eth0   Link encap:Ethernet  HWaddr 4e:4e:69:35:01:14
          inet addr:10.0.0.1  Bcast:10.255.255.255  Mask:255.0.0.0
          inet6 addr: fe80::4c4e:69ff:fe35:114/64 Scope:Link
          ...

lo        Link encap:Local Loopback
          inet addr:127.0.0.1  Mask:255.0.0.0
          inet6 addr: ::1/128 Scope:Host
          ...
Notice the IP and HW address of h1-eth0 interface. These are further configurable through Mininet options.
Notes
By default, Mininet provides isolated network namespace for hosts ONLY. Processes, files, and other entities such as switch networks use the root namespace. Run the command s1 ifconfig. You will notice that all interfaces in the root network namespace is listed.
Step 6 Take a look at the links of all nodes:
mininet> net
h1 h1-eth0:s1-eth1
h2 h2-eth0:s1-eth2
s1 lo:  s1-eth1:h1-eth0 s1-eth2:h2-eth0
This command gives us an overview of how the hosts are connected.
Step 7 Once you are finished with the Mininet environment, exit the command prompt:
mininet> exit
*** Stopping 1 controllers
c0
*** Stopping 2 links
...
completed in 25.211 seconds
sdn@slab:~$
In the case where Mininet has unexpectedly crashed, or you want to be sure that Mininet has been shutdown, run the following command:
sdn@slab:~$ sudo mn -c
*** Removing excess controllers/ofprotocols/ofdatapaths/pings/noxes
...
*** Cleanup complete.
sdn@slab:~$
2.2. Customizing Mininet
In addition to the simple three node topology we created previously, Mininet allows us to define custom topologies through Python APIs. We will explore several options to customize Mininet in a way that will be useful for debugging and learning purposes.
Step 1 Take a look at the file which defines a custom topology using Python API:
sdn@slab:~$ cat ~/mininet/custom/topo-2sw-2host.py
...
class MyTopo( Topo ):
 "Simple topology example."

 def __init__( self ):
     "Create custom topo."

     # Initialize topology
     Topo.__init__( self )

     # Add hosts and switches
     leftHost = self.addHost( 'h1' )
     rightHost = self.addHost( 'h2' )
     leftSwitch = self.addSwitch( 's3' )
     rightSwitch = self.addSwitch( 's4' )
...
sdn@slab:~$
In this file, you can see that the host, switch, and link are defined in the MyTopo class. Let’s launch a network using the custom topology file.
Step 2 Run the following command to start Mininet with the custom file:
sdn@slab:~$ sudo mn --custom ~/mininet/custom/topo-2sw-2host.py \
            --topo mytopo --mac --controller ovsc
...
*** Adding hosts:
h1 h2
*** Adding switches:
s3 s4
*** Adding links:
(h1, s3) (s3, s4) (s4, h2)
*** Configuring hosts
h1 h2
*** Starting controller
...
mininet>
- --custom - specify the custom topology file
- --topo - specify the topology class within the file
- --mac - set the MAC address of hosts to a readable ordered format
- --controller - specify a network controller (Default: ovs-controller)
Notes
Mininet by default starts with the ovs-controller which is a simple Ethernet learning entity that supports up to 16 switches. The default option –controller ovsc is explicitly stated for learning purposes. In the upcoming chapters, we will substitute the parameter with an external application.
Step 3 Run ifconfig on h1:
mininet> h1 ifconfig
h1-eth0   Link encap:Ethernet  HWaddr 00:00:00:00:00:01
       inet addr:10.0.0.1  Bcast:10.255.255.255  Mask:255.0.0.0
       inet6 addr: fe80::200:ff:fe00:1/64 Scope:Link
       UP BROADCAST RUNNING MULTICAST  MTU:1500  Metric:1
       RX packets:52 errors:0 dropped:0 overruns:0 frame:0
       TX packets:24 errors:0 dropped:0 overruns:0 carrier:0
       collisions:0 txqueuelen:1000
       RX bytes:4328 (4.3 KB)  TX bytes:2096 (2.0 KB)
...
mininet>
Notice that the HWaddr is set to 00:00:00:00:00:01 due to the –mac option we set when launching the topology.
You can also run shell commands on the host by utilizing the sh command on Mininet.
Step 4 Check the interface on the host machine without exiting Mininet prompt:
mininet> sh ifconfig
eth0      Link encap:Ethernet  HWaddr 02:a0:bd:20:8c:42
       inet addr:172.31.25.118  Bcast:172.31.31.255  Mask:255.255.240.0
       inet6 addr: fe80::a0:bdff:fe20:8c42/64 Scope:Link
...
mininet>
Step 5 Ping from h1 to h2:
mininet> h1 ping -c 4 h2
PING 10.0.0.2 (10.0.0.2) 56(84) bytes of data.
64 bytes from 10.0.0.2: icmp_seq=1 ttl=64 time=3.07 ms
64 bytes from 10.0.0.2: icmp_seq=2 ttl=64 time=0.253 ms
64 bytes from 10.0.0.2: icmp_seq=3 ttl=64 time=0.039 ms
64 bytes from 10.0.0.2: icmp_seq=4 ttl=64 time=0.038 ms
Note that Mininet is aware of all hostnames and their IP addresses.
Step 6 Clean up Mininet:
mininet> exit
...
sdn@slab:~$ sudo mn -c
Checkpoint
Ask yourself the following questions before proceeding
- How did h1 have connectivity with h2?
- Why is the first ping time significantly greater than the subsequent ones?
Great job, you are done with 2. Mininet chapter.