4. Open Network Operating System (ONOS)
Open Network Operating System (ONOS) provides a control plane for a software defined network. ONOS aims to be a carrier grade network controller focused on three key attributes: availability, scalability, and performance.
ONOS was chosen for this course based on the following considerations:
- Active open source project
- Production ready vendor agnostic SDN solution
- Easy to build all-in-one environment
- Extensive graphical user interface
In this chapter, we will go over the basic architecture of ONOS and how to interact with the CLI as well as GUI.
| Chapter Details | |
|---|---|
| Chapter Goal | Explore the functionalities of ONOS - Open Network Operating System |
| Chapter Sections | |
4.1. ONOS Architecture
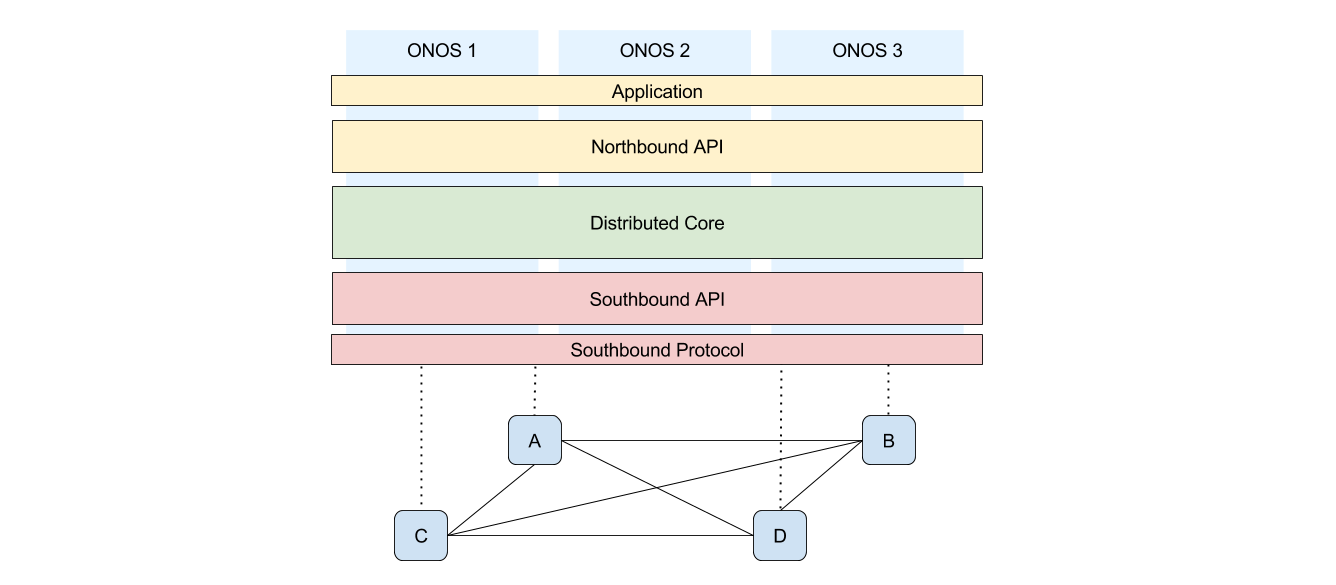
Open Network Operating System is composed of three main components.
- Northbound abstraction and APIs: ONOS provides data plane abstraction in the form of global network graph and application intents. Northbound APIs allow users to specify desired network connections without worrying about how it is processed.
- Distributed Core: This is where events are processed and distributed amongst the ONOS cluster. Its design allows the network controller to achieve scalability, high availability, and performance.
- Southbound abstraction and APIs: Southbound protocol interfaces with the newtork to provide device specific functions. It supports protocols such as OpenFlow and Netconf.
This can be summarized by the 3 node ONOS cluster diagram below.
Checkpoint
How would the Application layer be affected if the devices A and B were from different vendors with different protocols?
4.2. Getting Started with ONOS
In this lab, we will leverage Mininet to start up and emulate ONOS in a single VM. This setup allows us to efficiently create and test various network topologies with minimal configuration.
In the earlier chapter 2. Mininet, we learned that Mininet is a lightweight network emulator. The tool that will be used in this lab onos.py is actually a Mininet topology that will emulate our control network as well as the data network.
Important
onos.py provides convenience features such as port forwarding for ease of user interface access. This means that you may see interfaces in the environment that is not relevant to the topology you’ve created.
4.2.1. ONOS Command Line Interface
Step 1 Navigate to the ONOS developer directory:
sdn@slab:~$ cd ~/onos/tools/dev/mininet
Step 2 Start a ONOS using the onos.py custom file and a sample topology:
sdn@slab:~/onos/tools/dev/mininet$ sudo mn --custom onos.py \
         --controller onos,1 --topo tree,2,2
*** Creating network
*** Adding controller
*** Creating network
*** Adding hosts:
(unpacking /tmp/onos1)onos1
*** Adding swithces:
cs1
*** Adding links:
(onos1, cs1)
*** Configuring hosts
onos1
...
mininet-onos>
This starts up the all-in-one ONOS environment using Mininet.
The topology tree,2,2 indicates that it has a depth of 2 and span of 2 (respectively). The last row of the tree topology will be hosts and its parents will be switches.
Notes
The mininet-onos> prompt allows one to invoke Mininet or ONOS commands. Similar to the mininet> prompt, the topology will be deleted if you exit out of the prompt.
Step 3 One way to check the network connections is to issue net on Mininet:
mininet-onos> net
h1 h1-eth0:s2-eth1
h2 h2-eth0:s2-eth2
h3 h3-eth0:s3-eth1
h4 h4-eth0:s3-eth2
s1 lo:  s1-eth1:s2-eth3 s1-eth2:s3-eth3
s2 lo:  s2-eth1:h1-eth0 s2-eth2:h2-eth0 s2-eth3:s1-eth1
s3 lo:  s3-eth1:h3-eth0 s3-eth2:h4-eth0 s3-eth3:s1-eth2
c0
onos1 onos1-eth0:cs1-eth1
nat0 nat0-eth0:cs1-eth2
cs1 lo:  cs1-eth1:onos1-eth0 cs1-eth2:nat0-eth0
Step 4 Take a look at the onos help command. Pay particular attention to commands prefixed with onos::
mininet-onos> onos help
...
onos
onos:add-host-intent
onos:add-interface
onos:add-meter
onos:add-mpls-intent
...
These commands can be run by onos <command>, omitting the colon (:).
Step 5 If you want to learn more about a command, you can issue onos <command> –help:
mininet-onos> onos add-host-intent --help
DESCRIPTION
      onos:add-host-intent

      Installs host-to-host connectivity intent

SYNTAX
      onos:add-host-intent [options] one two
...
Step 6 The best way to execute commands on onos is to enter the onos> prompt such as the following:
mininet-onos> onos
...
Hit '<tab>' for a list of available commands
and '[cmd] --help' for help on a specific command.
Hit '<ctrl-d>' or type 'system:shutdown' or 'logout' to shutdown ONOS.

onos>
Notice that you can now use tab completion in the command line.
Step 7 Press ctrl-D or type logout to exit out of the onos> command prompt and return to onos-mininet> prompt:
onos> logout
mininet-onos>
4.2.2. ONOS User Interface
ONOS provides a Graphical User Interface (GUI) system that runs on the ONOS instance itself. It is structured as an AngularJS application and supports real-time updates using ONOS server APIs.
Step 1 Navigate to the ONOS user interface on your browser and log-in using the following credentials (Chrome recommended):
| URL | http://<slab-IP>:8181/onos/ui/ |
| User | onos |
| Password | rocks |
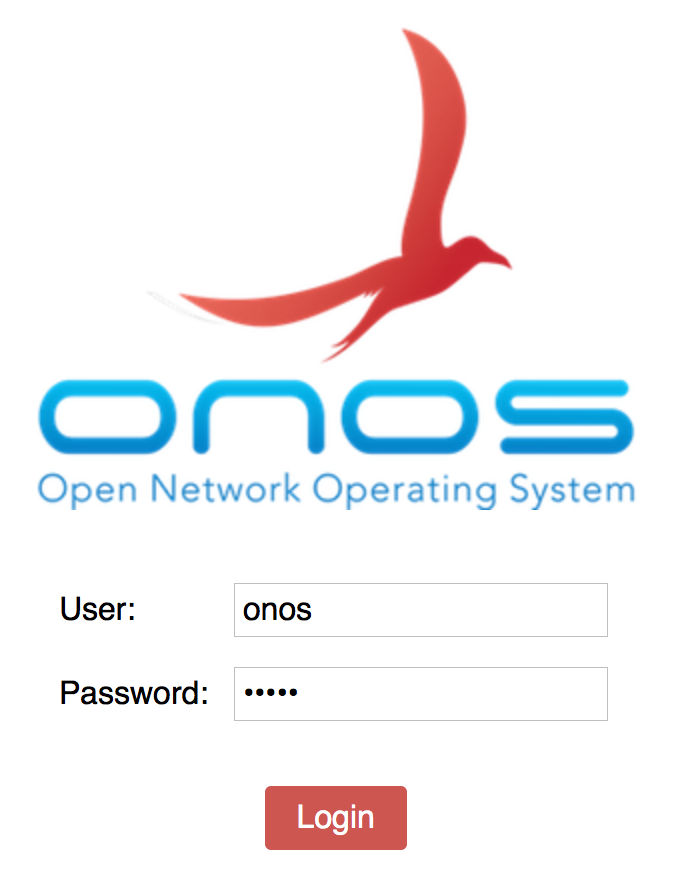
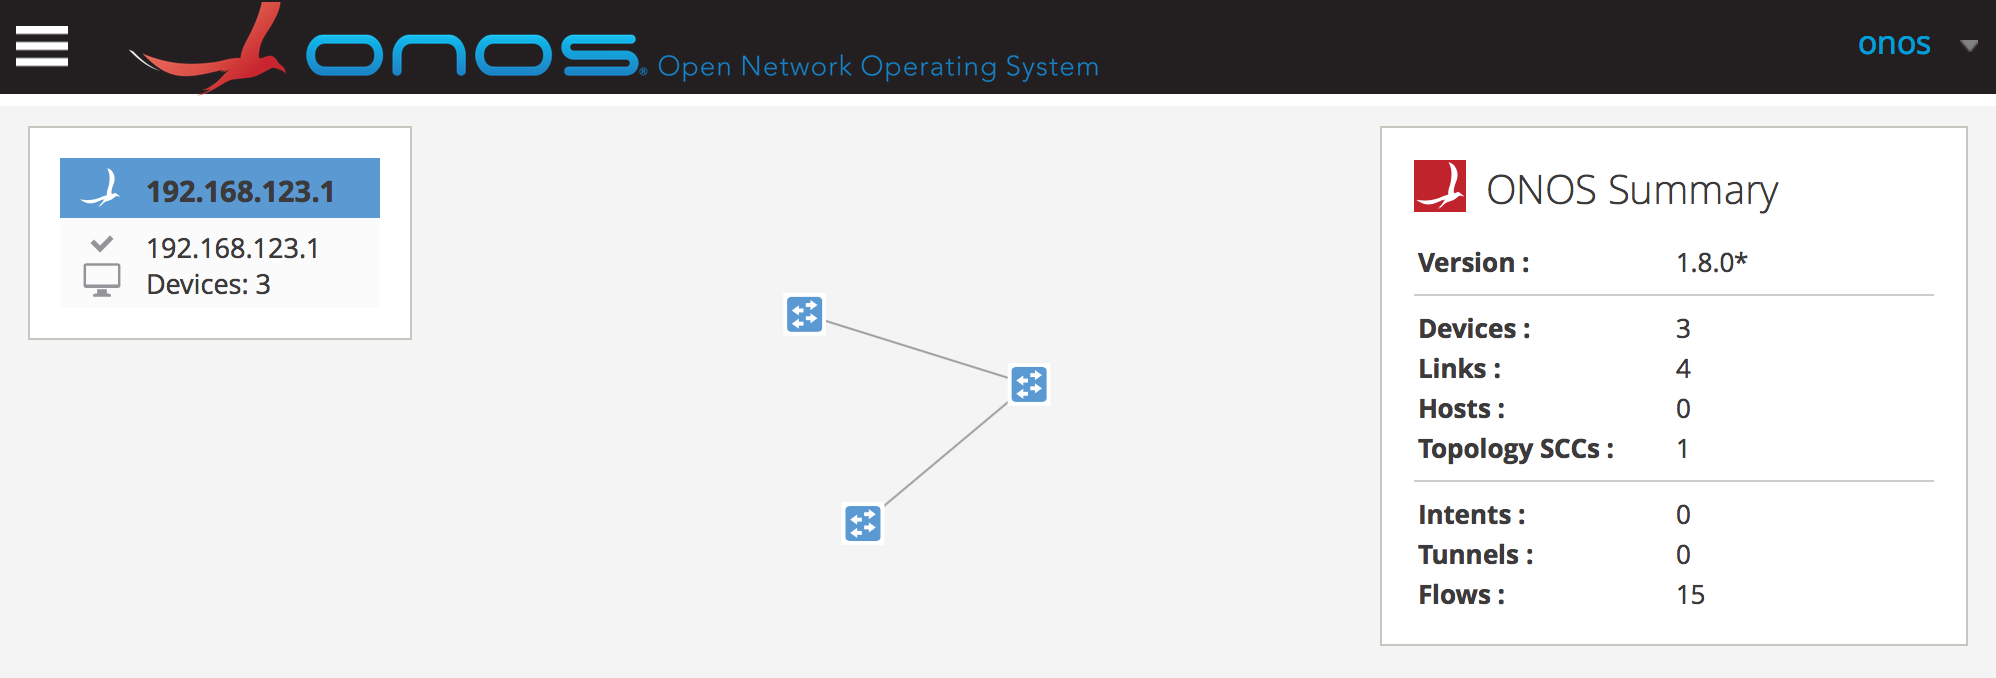
Once you are logged-in you will see the following ONOS user interface.
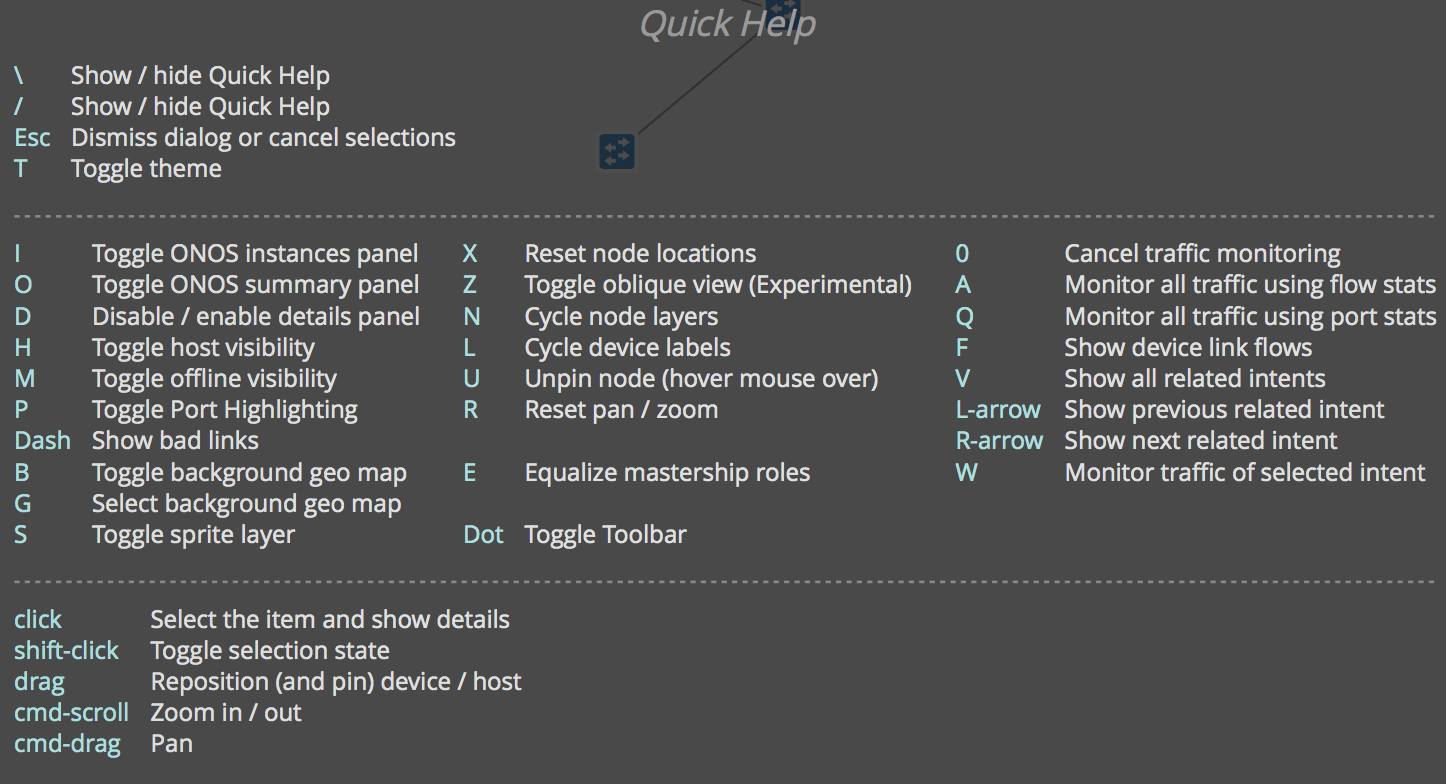
Step 2 Press “/” on your keyboard to see a list of keyboard shortcuts. Feel free to look around the interface:
Step 3 Return to the CLI and clean up the environment before proceeding:
mininet-onos> exit
...
sdn@slab:~$ sudo pkill java
sdn@slab:~$ sudo mn -c
Notes
We run sudo pkill java to kill any stale java processes. ONOS is written in Java and leverages Apache Karaf as its OSGi framework. For more information, consult the ONOS Wiki: wiki.onosproject.org
Checkpoint
Explore the user interface and gain familiarity with the shortcuts
Congratulations! You have completed 4. Open Network Operating System (ONOS)!