4. Docker Overlay2 Storage Driver
| Chapter Details | |
|---|---|
| Chapter Goal | Learn how Docker Overlay2 storage driver works |
| Chapter Sections | |
In this chapter, we will first experiment with Linux Overlay mount type to understand how Union Filesystem in Linux works. Then we will take a look at how Docker leverages this feature under the hood.
4.1. Linux Overlay Filesystem
Let’s create a fictitious tree of directories which we will mount using Overlay mount type.
Step 1 Create a overlayfs directory at /home/stack/:
$ mkdir /home/stack/overlayfs
Step 2 Create the following directories and files in /home/stack/overlayfs directory:
/home/stack/overlayfs/
             |_____lower1/
             |_____lower2/
             |_____merged/
             |_____upper/
             |_____work/

$ mkdir /home/stack/overlayfs/lower1 /home/stack/overlayfs/lower2  \
    /home/stack/overlayfs/upper /home/stack/overlayfs/merged /home/stack/overlayfs/work
Step 3 Create the corresponding files which identify the directories it belongs to. The naming will be helpful once we mount and view the merged overlay:
/home/stack/overlayfs/
             |_____lower1/
                    |_______lower1_file
             |_____lower2/
                    |_______lower2_file
             |_____merged/
             |_____upper/
                    |_______upper_file
             |_____work/

$ touch /home/stack/overlayfs/lower1/lower1_file \
        /home/stack/overlayfs/lower2/lower2_file \
        /home/stack/overlayfs/upper/upper_file
The /home/stack/overlayfs/merged and /home/stack/overlayfs/work directories are pre-emptively created to be passed in to the mount command.
Step 4 Become sudo before executing any mount commands:
$ sudo -i
#
Step 5 Change directory to /home/stack/overlayfs:
# cd /home/stack/overlayfs
/home/stack/overlayfs#
Step 6 Mount the two lowerdir to the upperdir using the overlay type:
/home/stack/overlayfs# mount -t overlay -o \
  lowerdir=./lower1:./lower2,upperdir=./upper,workdir=./work overlay ./merged
- Where:
- lowerdir: List of read-only lowerdir to merge separated by colons
- upperdir: Read-write top-most layer directory
- workdir: Empty directory used internally by OverlayFS
- overlay: Operation type
- ./merged: Directory to mount the merged view of the filesystem
Step 7 View the contents of the /home/stack/overlayfs/merged directory:
/home/stack/overlayfs# ls merged
 lower1_file  lower2_file  upper_file
As we expected, the merged directory shows all three files we created in our different filesystems. This directory is synonymous to the Container layer that Docker mounts to a running container.
Step 8 View the contents of the /home/stack/overlayfs/upper directory:
/home/stack/overlayfs# ls upper
 upper_file
This is the top-most layer; any changes we make in the merged directory will be written here. Let’s demonstrate that in the next steps.
Step 9 Edit the content of the lower1_file from the merged directory:
/home/stack/overlayfs# echo "from_merged" >> merged/lower1_file
Step 10 View the content of the lower1_file from the upper directory:
/home/stack/overlayfs# cat upper/lower1_file
 from_merged
Even though we only changed the content in the merged/lower1_file, Overlay Filesystem copied the lower1_file from the lowerdir and wrote the contents in the upperdir writable layer. upper directory is where the ‘physical’ copy of the text from_merged exists.
Let’s check the lower1 directory to see if its content has been changed as well.
Step 11 View the content of the lower1_file from the lower1 directory:
/home/stack/overlayfs# cat lower1/lower1_file
This file is empty. No changes are written to the Read-only lower directories. This behavior is desirable because multiple mounts can reference this lower1 directory and have a consistent view of its contents. If a different Overlay mount wants to make changes to its content, it will be written in their own ‘upper’ layer.
Step 12 Create a new file in the merged directory:
/home/stack/overlayfs# touch merged/merged_file
New files are also persisted in the upper directory.
Step 13 View the contents of the upper directory:
/home/stack/overlayfs# ls upper/
 lower1_file  merged_file  upper_file
If you are curious as to why we don’t see the lower2_file in the upper directory, it is because nothing has been changed between the lower2_file in the lower2 directory and the lower2_file in the merged directory. Therefore, any read requests to the lower2_file will directly go to the lower2 directory.
Keep in mind that any file or directory created in the upper directory which correspond to the names of the lower directories will be obscured and only the upper directory files will be presented to the merged overlay view.
Our current filesystem looks like the following:
/home/stack/overlayfs/
             |_____lower1/
                    |_______lower1_file
             |_____lower2/
                    |_______lower2_file
             |_____upper/
                    |_______lower1_file
                    |_______merged_file
                    |_______upper_file
             |_____merged/
                    |_______lower1_file
                    |_______lower2_file
                    |_______merged_file
                    |_______upper_file
             |_____work/
Notes
You may spend some time to issue a few more tests on this filesystem before we unmount it in the next step.
Step 14 View the current mount in the /home/stack/overlayfs directory:
# mount | grep 'overlayfs'
overlay on /home/stack/overlayfs/merged type overlay ...
Step 15 Unmount the /home/stack/overlayfs/merged mount:
# umount /home/stack/overlayfs/merged
Step 16 View the /home/stack/overlayfs/merged directory:
# ls /home/stack/overlayfs/merged
Step 17 View the /home/stack/overlayfs/upper directory:
# ls /home/stack/overlayfs/upper
lower1_file  merged_file  upper_file
Step 18 Exit sudo:
# exit
$
Great! we are now ready to take a look at Docker’s point of view. The next sections are overlay2 storage driver specific exercise. This is the recommended driver in the latest Docker release. Keep in mind that your choice of storage driver will affect how Docker manages the image layers.
4.2. Dockerfile and OverlayFS
Before you proceed with this section, ensure that you have created the flask-app directory and the docker image <user-name>/myfirstapp from 3.1.2. Build a Docker image
We will look at the image history of the myfirstapp we created. Then we will make a small change in one of the files, build a new image, and identify the changes to our image layers.
Step 1 Issue the docker history command on your image <user-name>/myfirstapp. Note that you should replace the field <user-name> with the one you have used to create the image:
$ docker history <user-name>/myfirstapp
IMAGE          CREATED       CREATED BY
4fe43899a36b   3 days ago    /bin/sh -c #(nop)  CMD ["python" "/usr/src...
47ce32c1d29a   3 days ago    /bin/sh -c #(nop)  EXPOSE 5000/tcp
c795d246ea4e   3 days ago    /bin/sh -c #(nop) COPY file:d94a62672c17d1...
3b3ffbcbf097   3 days ago    /bin/sh -c #(nop) COPY file:4efc9c4b535486...
78722e23d91d   3 days ago    /bin/sh -c pip install --no-cache-dir -r /...
1ae01a3347c9   3 days ago    /bin/sh -c #(nop) COPY file:6ddcb8ced92236...
24a5fce9f3b3   3 days ago    /bin/sh -c pip install --upgrade pip
5860d0f12416   3 days ago    /bin/sh -c apk add --update py2-pip
f80194ae2e0c   8 days ago    /bin/sh -c #(nop)  CMD ["/bin/sh"]
<missing>      8 days ago    /bin/sh -c #(nop) ADD file:84d23bb1bfe0358...
There are nine images with the IMAGE-ID field and one image which is noted as <missing> (we will get back to that later). The output is a summary of how our docker image <user-name>/myfirstapp was built.
Step 2 View the Dockerfile for the flask-app and compare the image history listing from above:
$ cat /home/stack/flask-app/Dockerfile

 # our base image
 FROM alpine:3.5

 # Install python and pip
 RUN apk add --update py2-pip

 # upgrade pip
 RUN pip install --upgrade pip

 # install Python modules needed by the Python app
 COPY requirements.txt /usr/src/app/
 RUN pip install --no-cache-dir -r /usr/src/app/requirements.txt

 # copy files required for the app to run
 COPY app.py /usr/src/app/
 COPY templates/index.html /usr/src/app/templates/

 # tell the port number the container should expose
 EXPOSE 5000

 # run the application
 CMD ["python", "/usr/src/app/app.py"]
As we know, each line of Dockerfile corresponds to an image layer. However, the docker history command suggests that there is an extra layer with the ID ‘<missing>’:
f80194ae2e0c   8 days ago    /bin/sh -c #(nop)  CMD ["/bin/sh"]
<missing>      8 days ago    /bin/sh -c #(nop) ADD file:84d23bb1bfe0358...
These two lines come from the statement FROM alpine:3.5. The <missing> tag is utilized by Docker’s build cache, and is required as an intermediary copy of the parent image; denoted by ADD file:84d23bb1bfe... The <missing> tag may seem erroneous, but it is just an implementation detail related to local image buliding - which may be ignored (but it’s fun to see where it came from, right?)
Let’s find the alpine:3.5 image on Docker Hub and track down the commands from the parent image.
Step 3 Find the alpine:3.5 image on Docker Hub and locate its Image Artifact Details page listed in the Quick reference. For your convenience, we have copied the link here:
This page shows us the following:
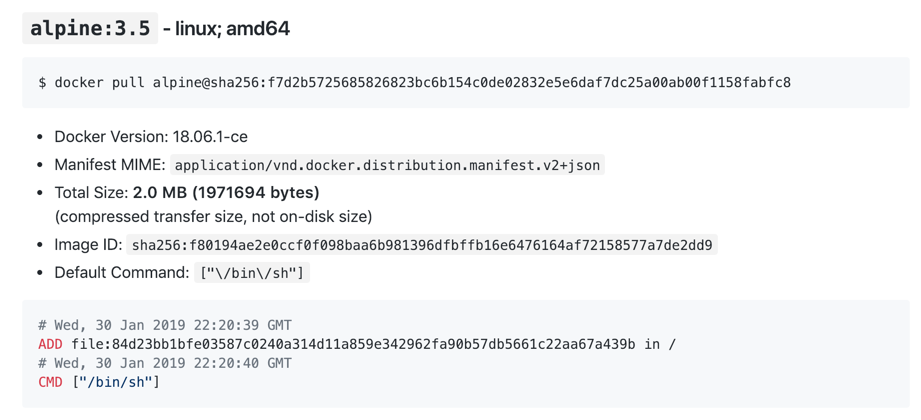
We can see that the ADD and CMD [“/bin/sh”] are the default specified commands in our parent image which is part of our docker history. (Your exact file character may be different than the screenshot depending on when you are running this lab).
Step 4 Open the /home/stack/flask-app/templates/index.html file and replace Cat Gif of the day with Cat Gif of the week. Save and quit the file:
$ vim /home/stack/flask-app/templates/index.html
...
    <div class="container">
    <h4>Cat Gif of the week</h4>
    <img src="{{url}}" />
...
Step 5 Build a new docker image based on this change:
$ docker build -t <user-name>/flaskapp2 /home/stack/flask-app/
Step 6 Compare the image history between the old image and the new image we created:
$ docker history <user-name>/myfirstapp
IMAGE          CREATED       CREATED BY
4fe43899a36b   3 days ago    /bin/sh -c #(nop)  CMD ["python" "/usr/src...
47ce32c1d29a   3 days ago    /bin/sh -c #(nop)  EXPOSE 5000/tcp
c795d246ea4e   3 days ago    /bin/sh -c #(nop) COPY file:d94a62672c17d1...
3b3ffbcbf097   3 days ago    /bin/sh -c #(nop) COPY file:4efc9c4b535486...
78722e23d91d   3 days ago    /bin/sh -c pip install --no-cache-dir -r /...
1ae01a3347c9   3 days ago    /bin/sh -c #(nop) COPY file:6ddcb8ced92236...
24a5fce9f3b3   3 days ago    /bin/sh -c pip install --upgrade pip
5860d0f12416   3 days ago    /bin/sh -c apk add --update py2-pip
f80194ae2e0c   8 days ago    /bin/sh -c #(nop)  CMD ["/bin/sh"]
<missing>      8 days ago    /bin/sh -c #(nop) ADD file:84d23bb1bfe0358...

$ docker history <user-name>/flaskapp2
IMAGE          CREATED              CREATED BY
298d94a967e5   About an hour ago    /bin/sh -c #(nop)  CMD ["python" "/usr/src...
32dc6805527b   About an hour ago    /bin/sh -c #(nop)  EXPOSE 5000/tcp
30dda928dd72   About an hour ago    /bin/sh -c #(nop) COPY file:8c790f733dc204...
3b3ffbcbf097   3 days ago           /bin/sh -c #(nop) COPY file:4efc9c4b535486...
78722e23d91d   3 days ago           /bin/sh -c pip install --no-cache-dir -r /...
1ae01a3347c9   3 days ago           /bin/sh -c #(nop) COPY file:6ddcb8ced92236...
24a5fce9f3b3   3 days ago           /bin/sh -c pip install --upgrade pip
5860d0f12416   3 days ago           /bin/sh -c apk add --update py2-pip
f80194ae2e0c   8 days ago           /bin/sh -c #(nop)  CMD ["/bin/sh"]
<missing>      8 days ago           /bin/sh -c #(nop) ADD file:84d23bb1bfe0358...
As you can see, three layers have changed and new image layers have been created starting with the COPY command which was for the templates/index.html file. This is why it is important to order the Dockerfile directives such that frequently changing artifacts should be towards the bottom of the file. Better yet, since the index.html is a piece of code, it should be a matter of downloading from a repository rather than copying over a new piece of code everytime a change is made.
Notes
‘docker manifest’ command is in experimental stages in version 18.02+ which allows to inspect, pull, and push image manifests from the registry. For more information, see: https://github.com/docker/cli/pull/138
4.3. Running Container and OverlayFS
Lastly, let’s run our newly created image and utilize Docker utilities to view the filesystems locations.
Step 1 Run the flaskapp2 we created in the previous section:
$ docker run -dP <user-name>/flaskapp2
13304e9fc3757f3752ddf843...
Step 2 Inspect the running container (Copy and paste the container ID from the output of the first command) and scroll down to view the “GraphDriver” key:
$ docker inspect <CONTAINER ID>
"GraphDriver": {
          "Name": "overlay2",
          "Data": {
              "LowerDir": "/var/lib/docker/overlay2/407ad1f1c9cdb5a947d97c09ed4cb8b924ba265df87f10533d898...
              "MergedDir": "/var/lib/docker/overlay2/407ad1f1c9cdb5a947d97c09ed4cb8b924ba265df87f10433d898/merged",
              "UpperDir": "/var/lib/docker/overlay2/407ad1f1c9cdb5a947d97c09ed4cb8b924ba265df87f10533d898/diff",
              "WorkDir": "/var/lib/docker/overlay2/407ad1f1c9cdb5a947d97c09ed4cb8b924ba265df87f10513d898/work"
          }
      }
The concepts we have learned in 4.1. Linux Overlay Filesystem apply to this output, where:
- LowerDir: Read-only image layers separated by colons from top most layer -> bottom most layer
- MergedDir: Merged view of all the layers
- UpperDir: Read-write layer where changes are written
- WorkDir: Used specifically by the underlying Linux OverlayFS
Keep these locations handy by copying it over to a text file!
Step 3 Log-in to the container and create a file in the root directory, then exit from the container:
$ docker exec -it <CONTAINER ID> /bin/sh

# touch /hello-from-container
# exit
Where do you think the new file was created? If you said in the UpperDir, you are correct! Let’s take a look.
Step 4 Become sudo, then list the contents of the UpperDir directory specific to your running container:
$ sudo -i
# ls /var/lib/docker/overlay2/<your-location>/diff
hello-from-container  root
As you can see, changes made to your container filesystem is stored in the “UpperDir”. Of course, it is also available in the “MergedDir”.
Step 5 Lastly, view the /var/lib/docker/overlay2 directory:
# ls /var/lib/docker/overlay2/
04c25422e8328ea076a55ed2f31d3fe51dec68225afc6632cf40d4fa3531fc6c
53f8d3506b1d3b136494adafa5500c6c50c65ec88c13c7f2945ee20f5a6f36ef
b2595ac081610fe2d195e550bff7afd3bc832d4e7fbc43462b659674c80d4f0c-init
04c25422e8328ea076a55ed2f31d3fe51dec68225afc6632cf40d4fa3531fc6c-init
53f8d3506b1d3b136494adafa5500c6c50c65ec88c13c7f2945ee20f5a6f36ef-init
d99085c36ac8163c8b69672f7aa3b9afcd33cf502d1792a3370abedb668b4f0d
059ae1a27495246eccbc1f64c27a881483fc81a8696a5269a6a5a897facd8436
5618685db218647f445527a50262b2942bb562f61b240686cbf921b50659af43
dcf62de6d364da88df6e072b553995dfc3faffadee63d88553f41c2cc69fd7db
l
As you can see, your Docker journey will leave you with many artifacts and gifts in your /var/lib/docker/overlay2 directory. You will need to remove any unused containers and its “dangling” images to clean-up after yourself.
Step 6 Take a look at the /var/lib/docker/overlay2/l directory:
# ls -lha /var/lib/docker/overlay2/l
lrwxrwxrwx  1 root root   72 Feb  5 21:34 27P43I4L5QQ46C3NMS33PR3EOT -> ../5618685db218640659af43/diff
lrwxrwxrwx  1 root root   72 Feb  8 20:58 2G3FG4AEOXZGO2BLBY5AXOEXRH -> ../2d0507a0a64dca7e588722/diff
lrwxrwxrwx  1 root root   77 Feb  8 21:18 3H6UK2OWJVMDKQ7RADZI7WZLYF -> ../b2595ac081610fe20d4f0c-init/diff
This is another implementation detail and not an accidental ‘l’ directory. These “shortened” values link to the longer names of the actual directories in the same directories. These symbolic links help avoid the Linux ‘mount’ command from exceeding page size limitation.
Step 7 Exit from sudo, and cleanup!:
# exit
$ docker rm -f <CONTAINER ID>
Checkpoint
- Create Linux Overlay FS using the mount command
- View and understand the docker history of a locally built image
- Run a container and explore how Docker stores data utilizing overlay filesystem
![]()
Table Of Contents
- 1. Classroom Environment
- 2. Docker Concepts
- 3. Docker Images
- 4. Docker Overlay2 Storage Driver
- 5. Kubernetes Installation
- 6. Kubernetes Building Blocks
- 7. Containerized Application Development
- 8. Kubernetes Addons
- 9. Kubernetes Best Practices
- 10. Kubernetes Architecture
- 11. Cluster Monitoring And Horizontal Autoscaling
- 12. Kubernetes Security
- 13. Cluster Management
- 14. Comprehensive Practice