8. Kubernetes Addons
In this lab we study, install, or modify some of kubernetes addons. Addons are containerized applications that are used to extend or modify kubernetes itself.
Note
YAML files for this lab are located in the directory ~/k8s-examples/addons.
| Chapter Details | |
|---|---|
| Chapter Goal | Understand and use Kubernetes addons |
| Chapter Sections | |
8.1. POD DNS Access
PODs have a dnsPolicy attribute with the default value of ClusterFirst when left unspecified. Other possible values are Default, ClusterFirstWithHostNet, and None. In this lab we examine the difference between these DNS policies.
Step 1
Kubernetes DNS inherits from, but does not manage, the Kubernetes node’s DNS settings in /etc/resolv.conf:
$ cat /etc/resolv.conf
# Dynamic resolv.conf(5) file for glibc resolver(3) generated by resolvconf(8)
#     DO NOT EDIT THIS FILE BY HAND -- YOUR CHANGES WILL BE OVERWRITTEN
nameserver 172.16.0.2
search eu-central-1.compute.internal
When kubelet launches a new instance it will add the above to every container’s resolv.conf. It is your responsibility to make sure the node has the correct settings.
Step 2 Let’s run a POD with default dnsPolicy and examine its resolv.conf. Create the below manifest in file bb-server-default-policy.yaml:
apiVersion: v1
kind: Pod
metadata:
  name: bb-server-default-policy
  labels:
    app: dns-check
spec:
  restartPolicy: Never
  containers:
  - name: busybox-server
    image: gcr.io/google-containers/busybox
    command:
      - sleep
      - "3600"
Create the pod:
$ kubectl apply -f bb-server-default-policy.yaml
pod "bb-server-default-policy" created
Check and compare the resolv.conf settings of the pod with the node from above:
$ kubectl exec bb-server-default-policy -- cat /etc/resolv.conf
nameserver 10.96.0.10
search default.svc.cluster.local svc.cluster.local cluster.local eu-central-1.compute.internal
options ndots:5
kubelet has replaced the nameserver with that of Kubernetes and added additional search parameters. The nameserver IP address is that of kube-dns service:
$ kubectl get svc -n kube-system kube-dns
NAME       TYPE        CLUSTER-IP   EXTERNAL-IP   PORT(S)         AGE
kube-dns   ClusterIP   10.96.0.10   <none>        53/UDP,53/TCP   6d
Check if dns is working:
$ kubectl exec bb-server-default-policy -- nslookup kubernetes
Server:    10.96.0.10
Address 1: 10.96.0.10 kube-dns.kube-system.svc.cluster.local

Name:      kubernetes
Address 1: 10.96.0.1 kubernetes.default.svc.cluster.local
Step 3 Let’s run the POD with dnsPolicy=Default (note that this not the default) and examine its resolv.conf. Create the below manifest in file bb-server-policy-default.yaml:
apiVersion: v1
kind: Pod
metadata:
  name: bb-server-policy-default
  labels:
    app: dns-check
spec:
  restartPolicy: Never
  containers:
  - name: busybox-server
    image: gcr.io/google-containers/busybox
    command:
      - sleep
      - "3600"
  dnsPolicy: Default
Create the pod:
$ kubectl apply -f bb-server-policy-default.yaml
pod "bb-server-policy-default" created
Check and compare the resolv.conf settings of the pod with the node from above:
$ kubectl exec bb-server-policy-default -- cat /etc/resolv.conf
nameserver 172.16.0.2
search eu-central-1.compute.internal
As you can guess, this pod will not have access to kube-dns:
$ kubectl exec bb-server-policy-default nslookup kubernetes
Server:    172.16.0.2
Address 1: 172.16.0.2

nslookup: can't resolve 'kubernetes'
command terminated with exit code 1
Step 4 If a pod uses the host network then it does not get a new network namespace, and will use the host network namespace. The rules for DNS policy for pods on the host network are the opposite of the above. By default these pods will not have access to kube-dns. To enable access we must set the dnsPolicy to ClusterFirstWithHostNet.
Let’s run the POD on the host network and check it. Create the below manifest in file bb-server-host.yaml:
apiVersion: v1
kind: Pod
metadata:
  name: bb-server-host
  labels:
    app: dns-check
spec:
  restartPolicy: Never
  containers:
  - name: busybox-server
    image: gcr.io/google-containers/busybox
    command:
      - sleep
      - "3600"
  hostNetwork: true
  dnsPolicy: ClusterFirstWithHostNet
Create the pod:
$ kubectl apply -f bb-server-host.yaml
pod "bb-server-host" created
Check and compare the resolv.conf settings of the pod with the node from above:
$ kubectl exec bb-server-host -- cat /etc/resolv.conf
nameserver 10.96.0.10
search default.svc.cluster.local svc.cluster.local cluster.local eu-central-1.compute.internal
options ndots:5
Check if dns is working:
$ kubectl exec bb-server-host nslookup kubernetes
Server:    10.96.0.10
Address 1: 10.96.0.10 kube-dns.kube-system.svc.cluster.local

Name:      kubernetes
Address 1: 10.96.0.1 kubernetes.default.svc.cluster.local
Step 5 Clean up by removing the pods:
$ kubectl delete pod -l app=dns-check
pod "bb-server-default-policy" deleted
pod "bb-server-policy-default" deleted
pod "bb-server-host" deleted
8.2. Kubernetes Dashboard
Kubernetes Dashboard is a general purpose, web-based UI for Kubernetes clusters. It allows users to manage applications running in the cluster and troubleshoot them, as well as manage the cluster itself.
8.2.1. Installation And Unauthenticated Access
The Dashboard is a containerized application that can be deployed and managed with Kubernetes. Before using the Dashboard we will install it into our cluster.
Step 1 Install the Kubernetes Dashboard:
$ kubectl create -f ~/k8s-examples/addons/dashboard/kubernetes-dashboard.yaml
secret "kubernetes-dashboard-certs" created
serviceaccount "kubernetes-dashboard" created
role "kubernetes-dashboard-minimal" created
rolebinding "kubernetes-dashboard-minimal" created
deployment "kubernetes-dashboard" created
service "kubernetes-dashboard" created
Step 2 Create a gateway proxy to the Kubernetes API server using the master node private ip address. This allows us to access the API using http (without any TLS certificates and https):
$ kubectl proxy --accept-hosts='^*$' --address=${PrivateIP} &
Starting to serve on 172.16.1.XX:8001
Check that authenticated kubernetes API-server is accessible via cluster IP address:
$ curl http://${PrivateIP}:8001/api
{
  "kind": "APIVersions",
  "versions": [
    "v1"
  ],
  "serverAddressByClientCIDRs": [
    {
      "clientCIDR": "0.0.0.0/0",
      "serverAddress": "172.16.1.62:6443"
    }
  ]
}
Step 3 Notice that kubernetes-dashboard pod comes along with a kubernetes-dashboard service:
$ kubectl -n kube-system describe service kubernetes-dashboard
Name:                     kubernetes-dashboard
Namespace:                kube-system
Labels:                   k8s-app=kubernetes-dashboard
Annotations:              <none>
Selector:                 k8s-app=kubernetes-dashboard
Type:                     ClusterIP
IP:                       10.100.158.53
Port:                     <unset>  443/TCP
TargetPort:               8443/TCP
Endpoints:                192.168.2.6:8443
Session Affinity:         None
External Traffic Policy:  Cluster
Events:                   <none>
Check that the Dashboard is accessible via cluster IP address. We will use the kubernetes-dashboard proxy feature to reach the dashboard through the api-server:
$ curl http://${PrivateIP}:8001/api/v1/namespaces/kube-system/services/https:kubernetes-dashboard:/proxy/
 <!doctype html> <html ng-app="kubernetesDashboard"> <head> <meta charset="utf-8">
....
Step 4 Get your master node public IP address to access the dashboard in your browser:
$ publicip
Step 5 Check that the Dashboard is accessible via public IP in your browser. Start you browser and open the following URL. Replace <publicip> with the output of the command from step 4:
http://<publicip>:8001/api/v1/namespaces/kube-system/services/https:kubernetes-dashboard:/proxy/
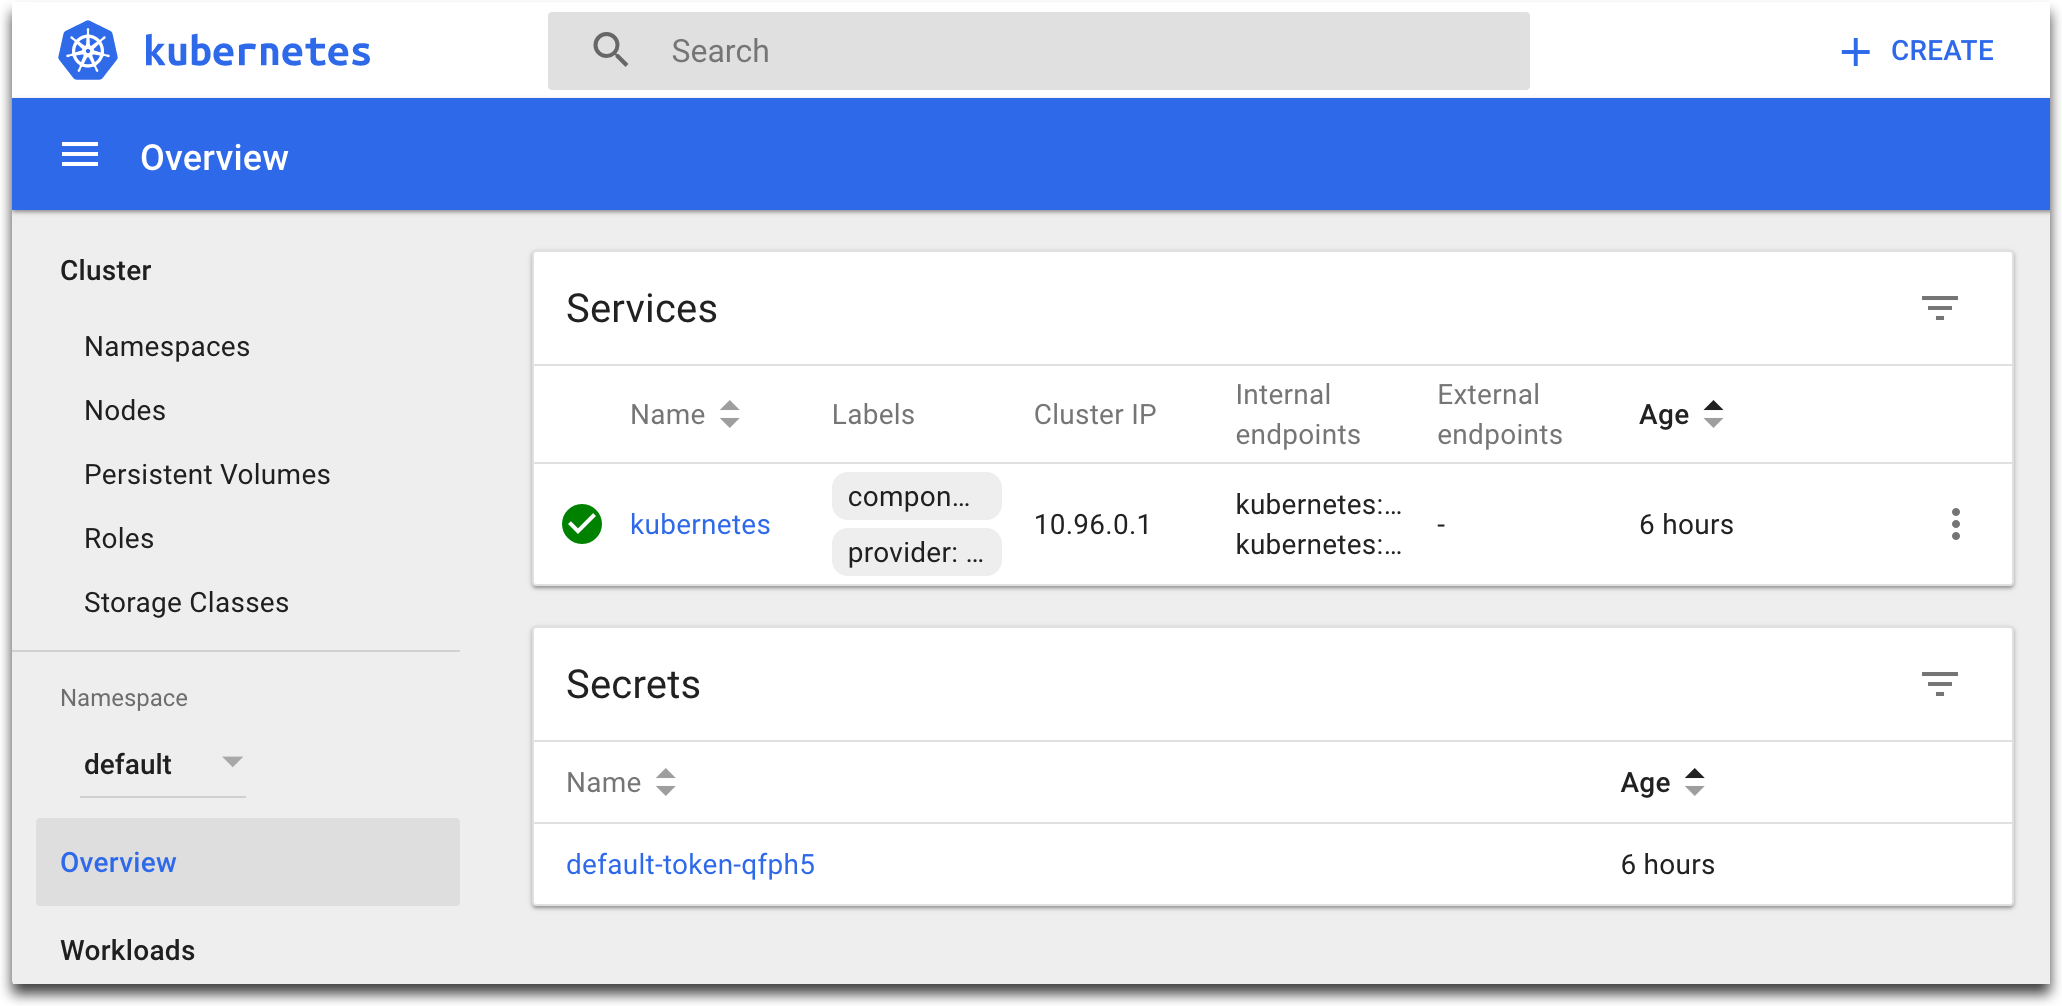
Select “Skip” to login as an unauthenticated user.
8.2.2. Authenticated Access
To login to the Kubernetes dashboard we can use a bearer token for authentication. We can retrieve one from any existing ServiceAccount. You can view a list of available ServiceAccounts in the kube-system NameSpace:
$ kubectl get serviceaccount -n kube-system
Step 1 Creating a ServiceAccount is easy, so let’s create our own:
$ kubectl -n default create serviceaccount admin
serviceaccount/admin created
Step 2 Let’s give our ServiceAccount adminstrative privileges for the whole cluster:
$ kubectl create clusterrolebinding admin --clusterrole=cluster-admin --serviceaccount=default:admin
clusterrolebinding.rbac.authorization.k8s.io/admin created
Step 3 ServiceAccounts are created with their own Kubernetes Secret. The secret holds an authentication token. Retrieve the token Secret name from the ServiceAccount:
$ secret=$(kubectl get serviceaccount admin -o jsonpath='{.secrets[0].name}')
Retrieve the actual token value from the secret. Secret values are base64 encoded, so they must be decoded before use:
$ token=$(kubectl get secret $secret -ojsonpath='{.data.token}' | base64 --decode)
Step 4 Test the token to make sure it works:
$ kubectl --token=$token get node -o wide
Step 5 In the past we were able to access the UI through http://<publicip>:8001 like the rest of Kubernetes API using the token retrieved above. However, due to security issues newere versions of kubernetes-dashboard have a installed server-side TLS certificate that only allows access from the local network. This in turn makes the browser reject the presented certificate when we access the UI remotely through the proxie.
There are many ways to work around this issue, among them:
- Redeploy the dashboard with new certificates reflecting our domain name.
- Download and install kubectl on our local machine, and run kubectl proxy on our local machine. Then access the UI through http://localhost:8001. In this manner the localhost IP address will match that of the dashboard’s default certificate.
- Create a ssh tunnel to access the UI. That means creating a new ssh connection from your local machine to your kubernetes master node that establishes a ssh-tunnel from you local machine port 8001 to the master node port 8001
The below instructions explain how to create a ssh-tunnel to the master node.
Important
The steps below should be run on your local laptop, not the lab environment. We are creating an SSH tunnel to bypass some of the issues of running the dashboard and exposing it publicly. If you have issues with the following steps, please ask the instructor for help.
On your local machine ssh to the master node and establish a tunnel on port 8001:
$ ssh -L 8001:<privateip>:8001 stack@<publicip>
Step 6 Now use the below URL to access the dashboard from your browser:
http://localhost:8001/api/v1/namespaces/kube-system/services/https:kubernetes-dashboard:/proxy/
Step 6 In your ssh shell display the token value and use the mouse to copy the value of the token to your clipboard:
$ echo $token
In your browser window select Token as the authentication method and paste the value of $token from above in “Enter token” field, click “SIGN IN”.
Step 7 We now are logged in as a privileged authenticated user:
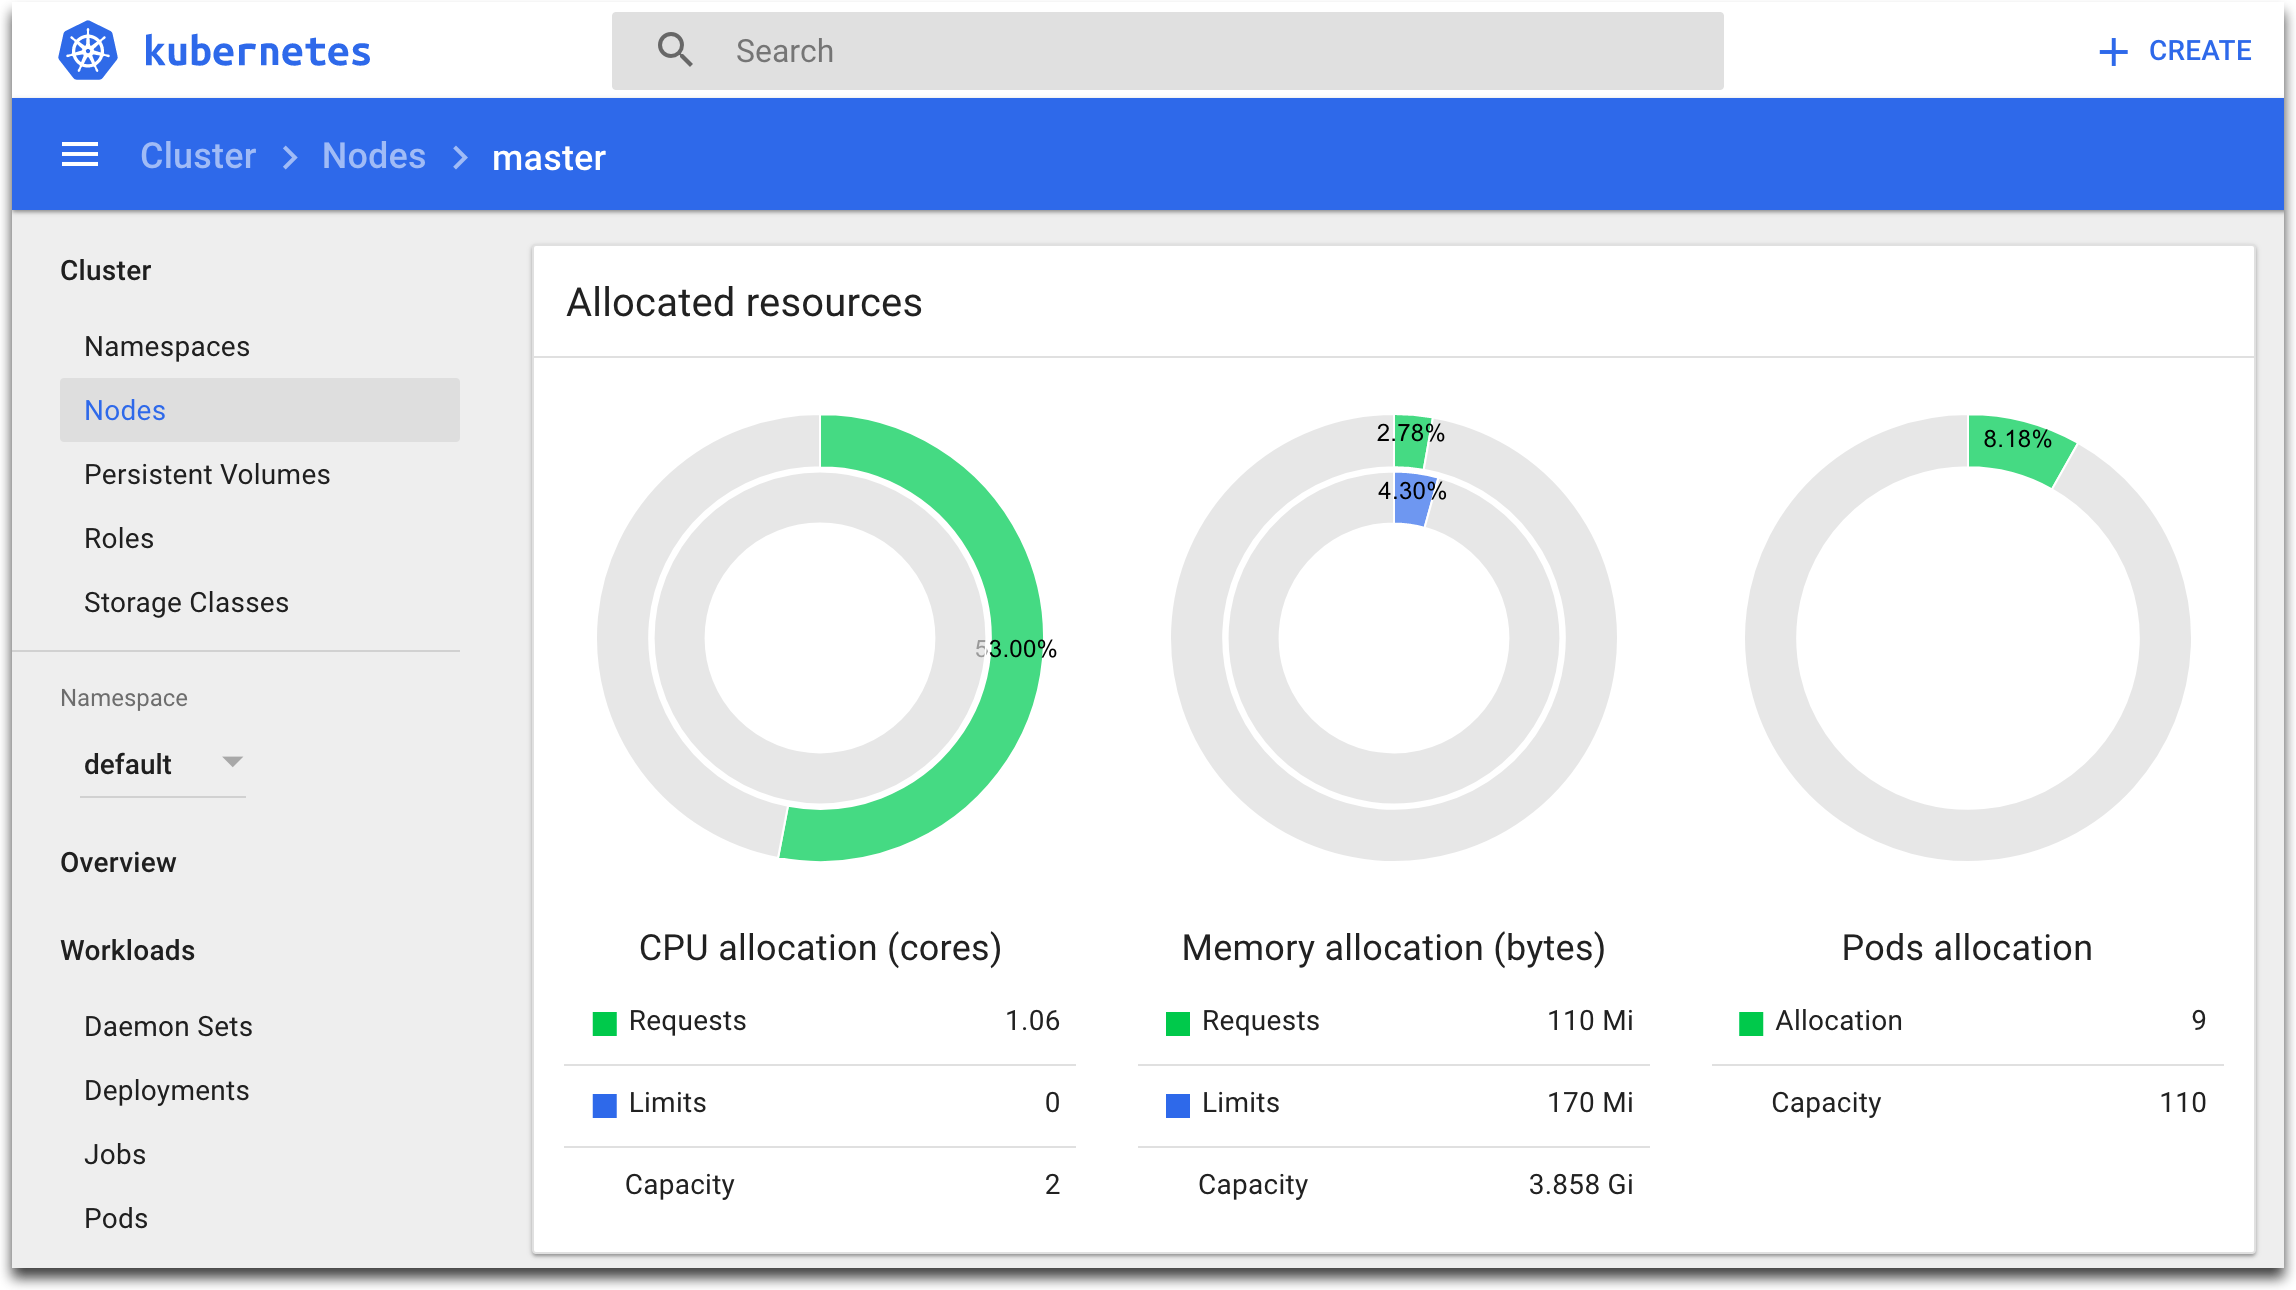
Step 8 Explore the Dashboard. In the left menu, choose Nodes, then select a node. In the main section of the Dashboard, you can see node’s details, allocated resources, conditions, pods, events:
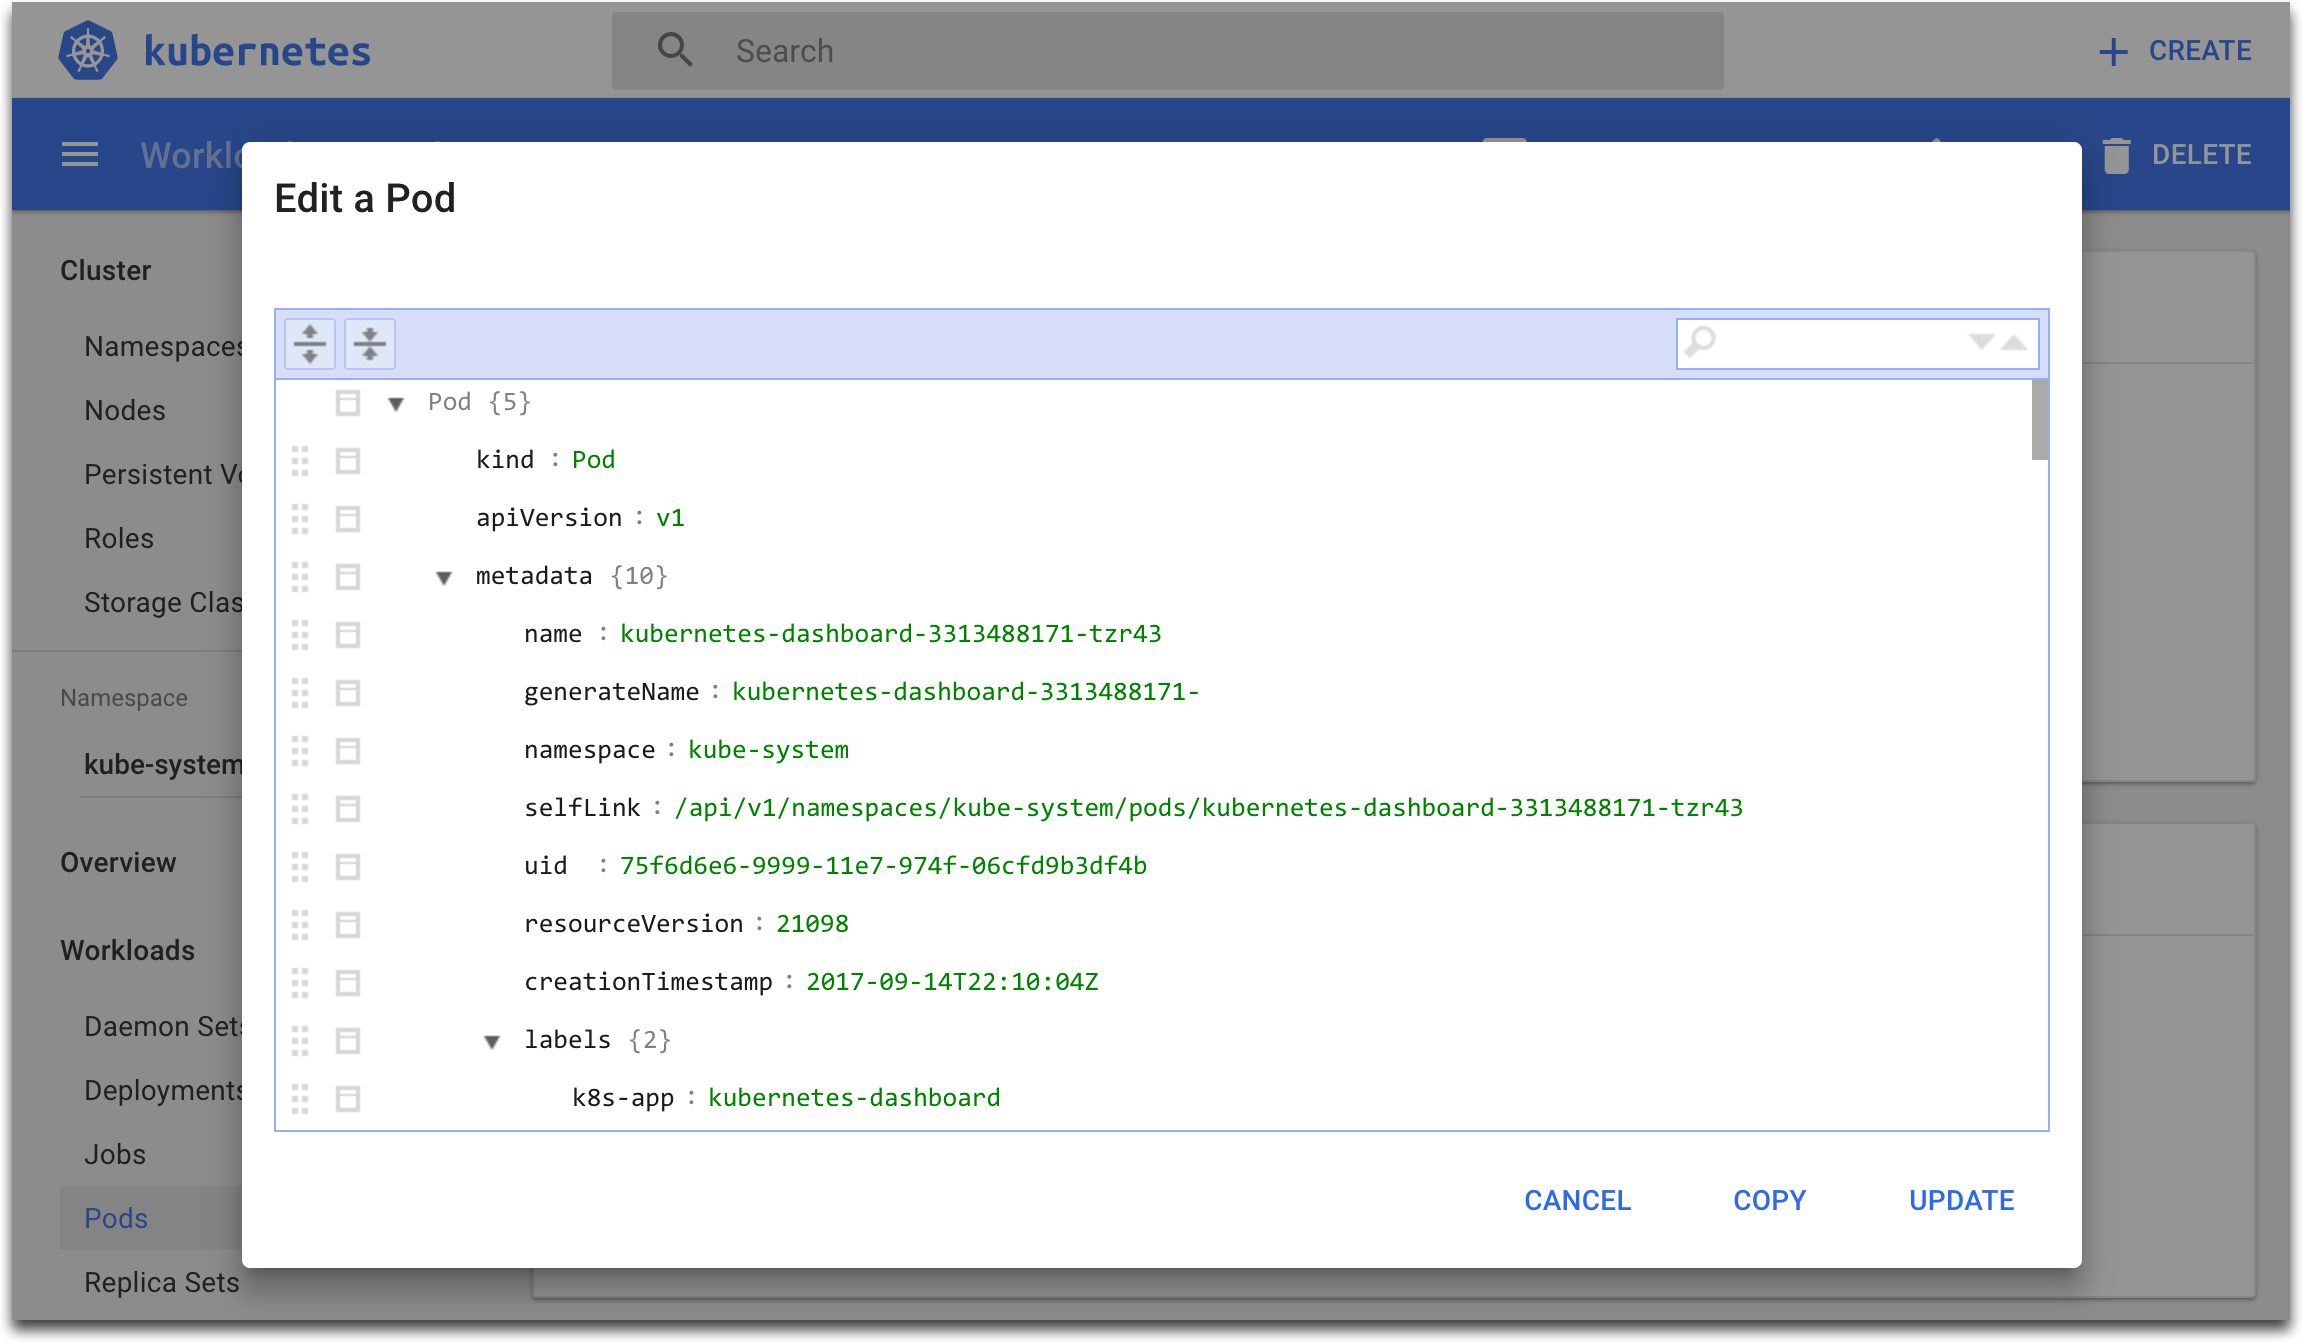
Step 9 Using the Dashboard, you can also create new building blocks and edit the existing building blocks:
8.3. Ingress And Ingress Controller
Kubernetes Ingress is an abstraction atop Kubernetes Service to provide load balancing, SSL termination, name-based virtual hosting, and path based routing for HTTP/HTTPS ingress access. It can reduce cost by multiplexing multiple application endpoints through a single cloud load-balancer endpoint.
In this lab we will install the ingress-nginx Ingress Controller, and will create Ingress objects to utilitze it.
Step 1 Deploy the ingress-nginx Ingress Controller:
$ kubectl apply -f k8s-examples/addons/ingress/deploy/mandatory.yaml
namespace "ingress-nginx" created
deployment "default-http-backend" created
service "default-http-backend" created
configmap "nginx-configuration" created
configmap "tcp-services" created
configmap "udp-services" created
serviceaccount "nginx-ingress-serviceaccount" created
clusterrole "nginx-ingress-clusterrole" created
role "nginx-ingress-role" created
rolebinding "nginx-ingress-role-nisa-binding" created
clusterrolebinding "nginx-ingress-clusterrole-nisa-binding" created
deployment "nginx-ingress-controller" created
Step 2 Create the ingress-nginx service of type NodePort`:
$ kubectl apply -f k8s-examples/addons/ingress/deploy/service-nodeport.yaml
service "ingress-nginx" created
Step 3 Check the installation:
$ kubectl get all -n ingress-nginx
NAME                              DESIRED   CURRENT   UP-TO-DATE   AVAILABLE   AGE
deploy/default-http-backend       1         1         1            1           11h
deploy/nginx-ingress-controller   1         1         1            1           11h

NAME                                     DESIRED   CURRENT   READY     AGE
rs/default-http-backend-55c6c69b88       1         1         1         11h
rs/nginx-ingress-controller-5f6d649c67   1         1         1         11h

NAME                                           READY     STATUS    RESTARTS   AGE
po/default-http-backend-55c6c69b88-bsc6m       1/1       Running   0          11h
po/nginx-ingress-controller-5f6d649c67-k5gsh   1/1       Running   0          11h

NAME                       TYPE        CLUSTER-IP      EXTERNAL-IP   PORT(S)                      AGE
svc/default-http-backend   ClusterIP   10.110.62.216   <none>        80/TCP                       11h
svc/ingress-nginx          NodePort    10.104.0.205    <none>        80:31872/TCP,443:31010/TCP   11h
Step 4 Launch a webserver and service so we can test ingress object:
$ kubectl run --image=nginx nginx-app --port=80 --env="DOMAIN=cluster" --restart=Never --expose
service "nginx-app" created
pod "nginx-app" created
Test the webserver using its service endpoint to make sure it is working:
$ curl $(kubectl get svc nginx-app -o jsonpath={..clusterIP})
<!DOCTYPE html>
<html>
<head>
<title>Welcome to nginx!</title>
....
</head>
<body>
<h1>Welcome to nginx!</h1>
<p>If you see this page, the nginx web server is successfully installed and
working. Further configuration is required.</p>

<p>For online documentation and support please refer to
<a href="http://nginx.org/">nginx.org</a>.<br/>
Commercial support is available at
<a href="http://nginx.com/">nginx.com</a>.</p>

<p><em>Thank you for using nginx.</em></p>
</body>
</html>
Step 5 Create an ingress object. Create the file ingress-mysite-com.yaml with the content below:
apiVersion: extensions/v1beta1
kind: Ingress
metadata:
  name: nginx-app
spec:
  rules:
  - host: mysite.com
    http:
      paths:
      - backend:
          serviceName: nginx-app
          servicePort: 80
Create the ingress:
$ kubectl apply -f ingress-mysite-com.yaml
ingress "nginx-app" created
Step 6 Test if the ingress and ingress controller are doing the right thing:
$ curl -H "Host:mysite.com" http://${PublicIP}:$(kubectl get -n ingress-nginx svc/ingress-nginx -o jsonpath={..ports[0].nodePort})
....
<body>
<h1>Welcome to nginx!</h1>
<p>If you see this page, the nginx web server is successfully installed and
working. Further configuration is required.</p>

<p>For online documentation and support please refer to
<a href="http://nginx.org/">nginx.org</a>.<br/>
Commercial support is available at
<a href="http://nginx.com/">nginx.com</a>.</p>

<p><em>Thank you for using nginx.</em></p>
</body>
Check to see if the default backend works:
$ curl http://${PublicIP}:$(kubectl get -n ingress-nginx svc/ingress-nginx -o jsonpath={..ports[0].nodePort})
default backend - 404
Step 7 Clean up:
$ kubectl delete pod,svc,ing nginx-app
pod "nginx-app" deleted
service "nginx-app" deleted
ingress "nginx-app" deleted
Checkpoint
- Use Kubernetes Cluster DNS
- Use Kubernetes Dashboard
- Use Kubernetes Ingress
![]()
Table Of Contents
- 1. Classroom Environment
- 2. Docker Concepts
- 3. Docker Images
- 4. Docker Overlay2 Storage Driver
- 5. Kubernetes Installation
- 6. Kubernetes Building Blocks
- 7. Containerized Application Development
- 8. Kubernetes Addons
- 9. Kubernetes Best Practices
- 10. Kubernetes Architecture
- 11. Cluster Monitoring And Horizontal Autoscaling
- 12. Kubernetes Security
- 13. Cluster Management
- 14. Comprehensive Practice
Previous topic
7. Containerized Application Development