14. Comprehensive Practice
The purpose of the comprehensive practice is to give students an opportunity to review the concepts learned, fill any remaining gaps, and deepen their understanding of the course material.
This lab will not be presented as a step-by-step lab guide. Rather, this workshop is presented as a list of high level tasks that students should be prepared to execute. The lab will also act as an opportunity to prepare students who plan to take the CKA/D certification exams.
| Chapter Details | |
|---|---|
| Chapter Goal | Review the topics covered in the course |
| Chapter Sections | |
14.1. General Guidlines
If you’re not sure which command to use for step execution, run kubectl --help | grep -i <topic> to find an appropriate subcommand. You may then run kubectl <subcommand> --help for additional help. Enabling bash completion by running source <(kubectl completion bash) is also helpful.
It is best to use yaml configuration files and declarative commands such as kubectl create -f <resource.yaml> to create your objects. Also helpful, would be using kubectl apply instead of kubectl create during development for safe updating and quick redeployment of your resource.
To find sample configuration files you may refer to http://kubernetes.io/docs/home and search for resource specification sytanx. Alternatively, you may use kubectl explain <resource> to get detailed explaination of resource subfields.
14.2. Exam Guidlines
During this workshop you should only use the dashboard to verify your results, not to implement your solution, because the Kubernetes dashboard will be unavailable during the exams.
During the CKA or CKAD exam you are only allowed one ssh login window and one browser window (a single browser tab). In the browser you may view and copy/paste from any document on http://kubernetes.io but may not have multiple browser tabs open.
In your login shell you may benefit from tools such as tmux or screen to create multiple windows. For example, you can use tmux to create three windows, run kubectl <subcommand> --help in one, kubectl explain <resource> in the second, and copy/paste your response in the third window.
14.3. Comprehensive Practice Overview
Your manager has asked you to port an existing Docker Swarm application to Kubernetes. You can find the Swarm yaml file at https://github.com/dockersamples/example-voting-app/blob/master/docker-stack.yml. Use Kubernetes PersistentVolumes, PersistentVolumeClaim, Deployment, and Service resources in your implementation. As an overall guidance in porting this project please keep in mind that swarm services find each other using swarm’s built-in DNS. Hence, when porting to Kubernetes we can replace the swarm service with a Kubernetes Service with the same name, listening on the same port, and any application using DNS service discovery should continue to behave the same - i.e. do not change the service names.
14.4. Comprehensive Practice Task List
Task 1 Review the existing Docker Swarm deployment and gather requirements.
The Example Voting App is a popular Docker training application which we already used in Section 3.2. Build a multi-container application. It is composed of five component apps, each of which is a containerized application you can pull from Docker hub, that interact with each other as depicted here:
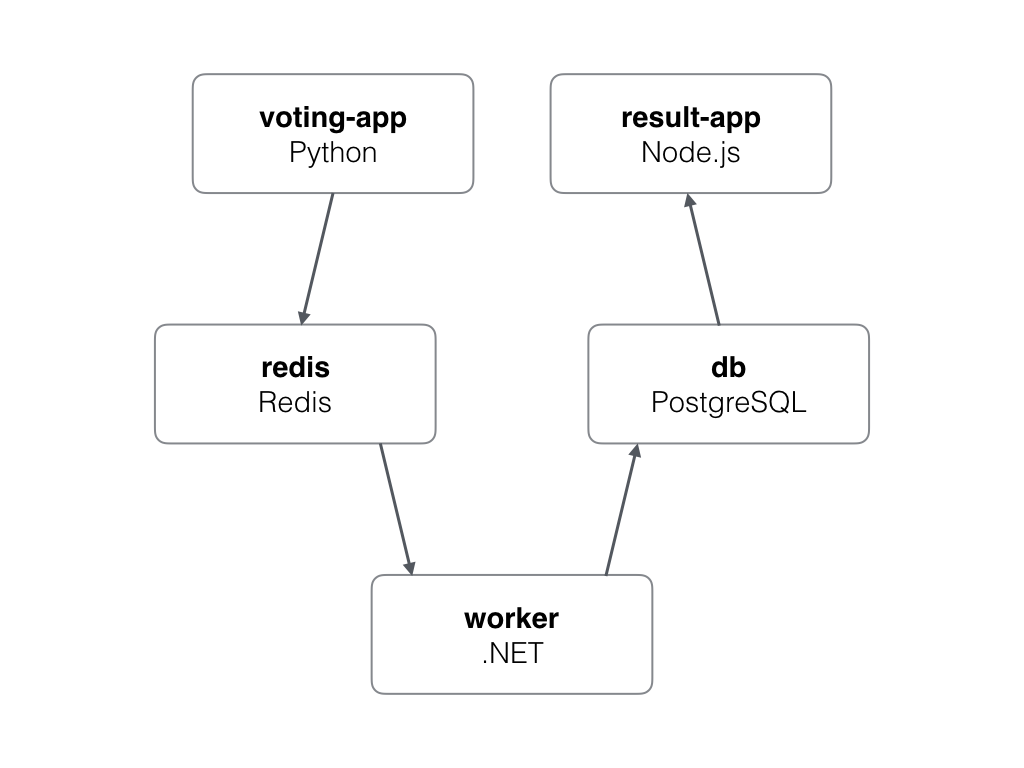
- A Python webapp which lets you vote between two options
- A Redis queue which collects new votes
- A .NET worker which consumes votes and stores them in a database
- A Postgres database backed by a Docker volume
- A Node.js webapp which shows the results of the voting in real time
Follow the instructions below to create your solution. A Kubernetes solution is available at https://github.com/dockersamples/example-voting-app/tree/master/k8s-specifications as a reference. At the end of this exercise, or if you need help, you may compare your solution to the standard solution there.
14.4.1. Administrative Tasks
Task 2 As a kubernetes cluster admin create three PersistenVolumes of type hostPath and size 50Mi, 100Mi, and 150Mi.
Task 3 As a kubernetes cluster admin create a namespace called vote.
14.4.2. Project Specific Tasks
These tasks are specific to the vote project.
Task 4 Set the current context to vote
Task 5 Create a PersistentVolumeClaim with accessMode of read and write of size 80Mi.
Task 6 Create a deployment with 1 replica for image postgres:9.4 and use the PVC created in the previous step for the database.
Task 7 Create a Service for the previous deployment which targets port 5432
Task 8 Create a deployment with 2 replicas for image redis:alpine with port 6379
Task 9 Create a Service for the previous deployment which targets port 6379
Task 10 Create a Deployment with 2 replicas for image dockersamples/examplevotingapp_worker
Task 11 Create a Deployment with 2 replica for image dockersamples/examplevotingapp_vote:before
Task 12 Create a Service of type NodePort for the previous deployment
Task 13 Create a Deployment with 2 replica for image dockersamples/examplevotingapp_result:before
Task 14 Create a Service of type NodePort for the previous deployment
Task 15 Test your deployment in your browser
Task 16 View your application resources in the dashboard
Great job, you are done with the 14. Comprehensive Practice chapter.
Checkpoint
- Practice all of the topics presented in this course
- Take all that’s been covered and put it all together
- Familiarize yourself with both the dashboard and the command-line client of Kubernetes
![]()
Table Of Contents
- 1. Classroom Environment
- 2. Docker Concepts
- 3. Docker Images
- 4. Docker Overlay2 Storage Driver
- 5. Kubernetes Installation
- 6. Kubernetes Building Blocks
- 7. Containerized Application Development
- 8. Kubernetes Addons
- 9. Kubernetes Best Practices
- 10. Kubernetes Architecture
- 11. Cluster Monitoring And Horizontal Autoscaling
- 12. Kubernetes Security
- 13. Cluster Management
- 14. Comprehensive Practice