2. Explore HA OpenStack
Before deploying your own highly available OpenStack, let’s explore the existing one. In this lab, you will use your personal OpenStack environment to see how OpenStack services are configured in HA mode. Also you will emulate different types of failures and do a live migration of an instance from one host to another.
| Chapter Details | |
|---|---|
| Chapter Goal | Explore the HA OpenStack environment |
| Chapter Sections | |
2.1. Prerequisites
Check that the following prerequisite has been met:
- You have access to the lab environment
2.2. Explore Nodes and Networks
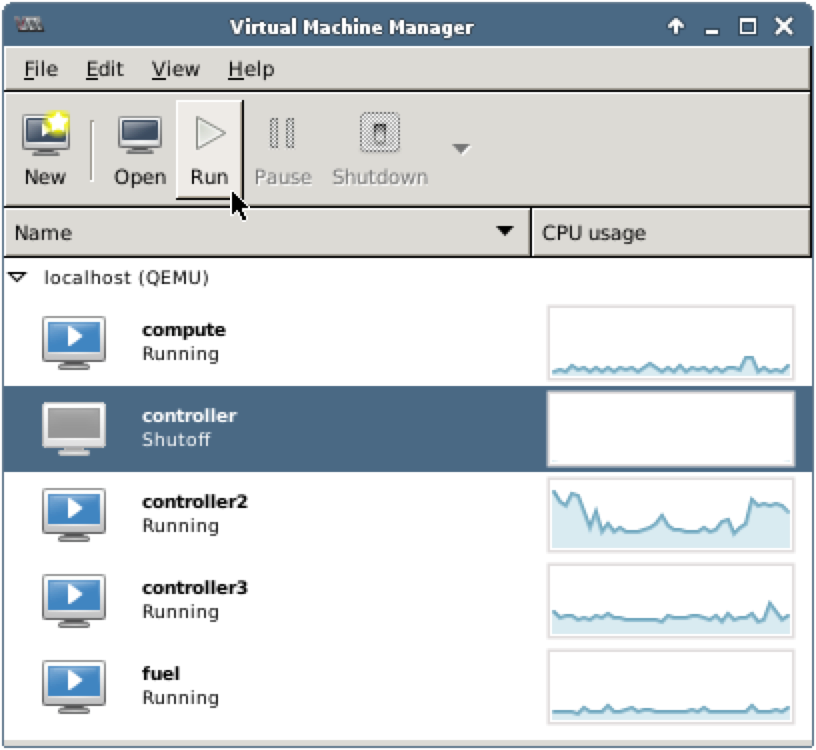
Step 1 Start Virtual Machine Manager:
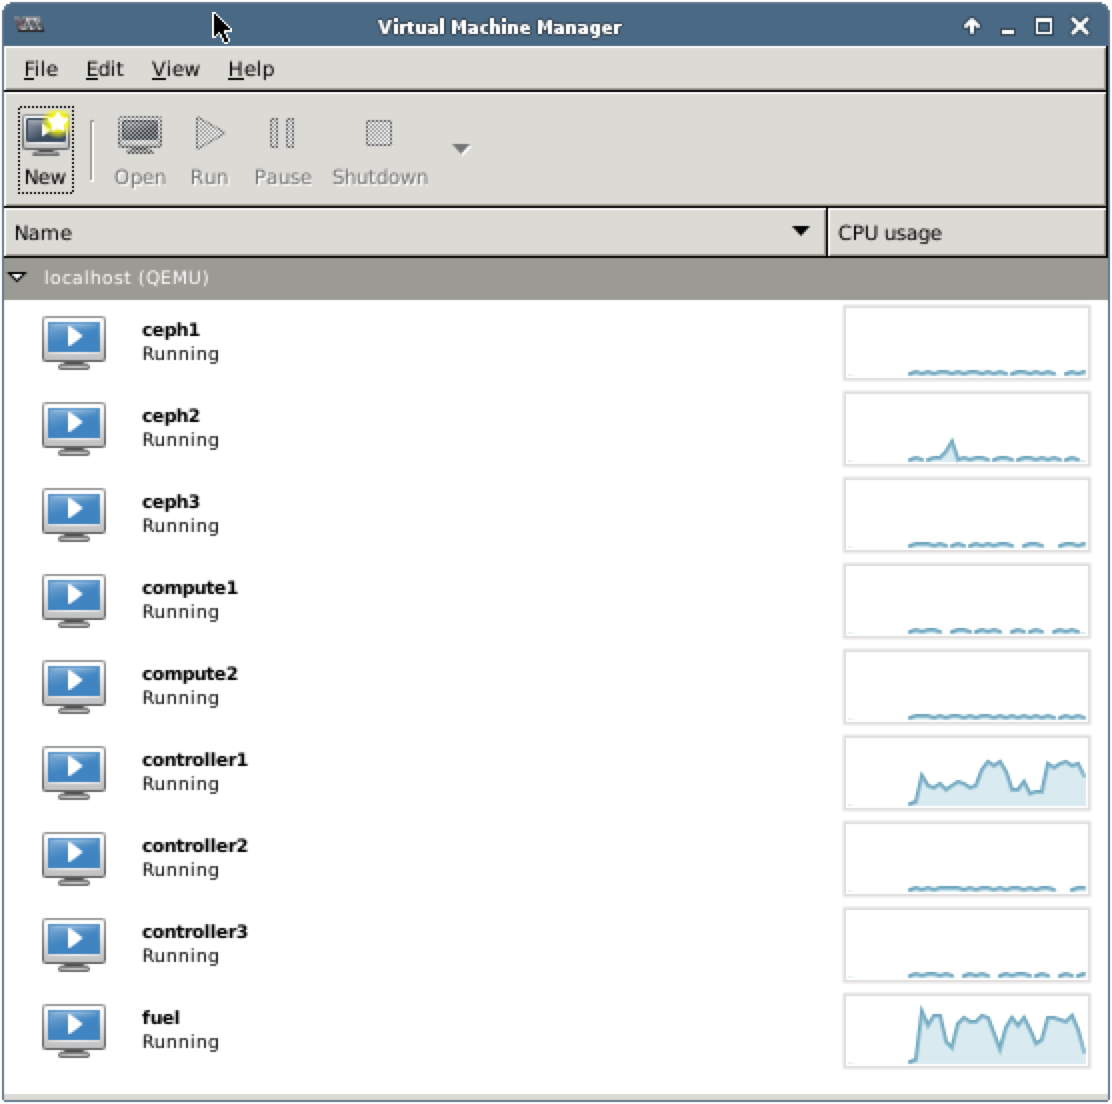
Check that the following VMs are up and running:
- 3 storage nodes: ceph1, ceph2, ceph3
- 2 compute nodes: compute1, compute2
- 3 controller nodes: controller1, controller2, controller3
- 1 Fuel node: fuel
Notes
These VMs represent physical servers in a data center. We have used Fuel to make this deployment, so there is a dedicated node for it. We will discuss and use Fuel later in our labs. Other 8 VMs are the nodes of your OpenStack environment.
Step 2 From the main menu choose Edit, then Connection Details to open Connection Details window. Choose Virtual Networks tab:
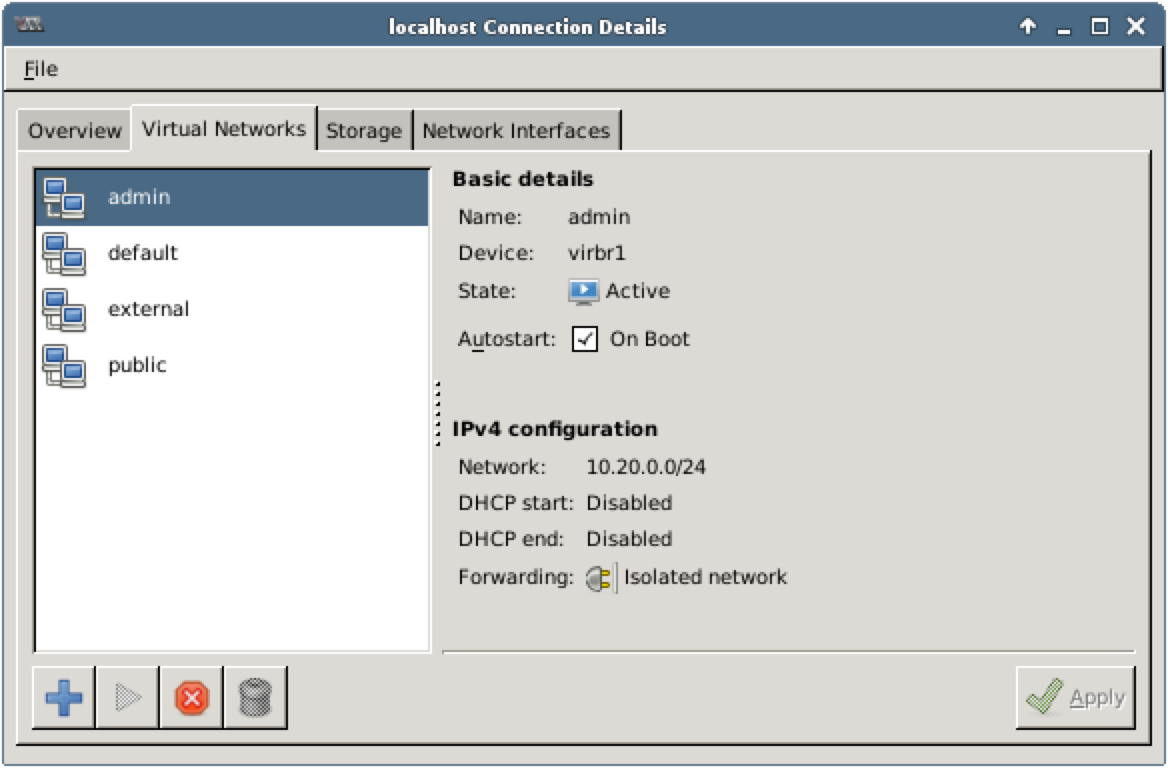
Check that the following networks are available:
- admin
- default
- external
- public
Step 3 Let’s explore how OpenStack nodes are connected to the available networks. In Virtual Machine Manager, choose a VM. From menu choose Edit, Virtual Machine Details to open the Virtual Machine window (alternatively, you can double click on VM from the list to open the same window). Press Details button. The list contains virtual hardware that is configured for the selected VM. Choose NIC from the list to see the network interface settings, specifically the network it is connected to.
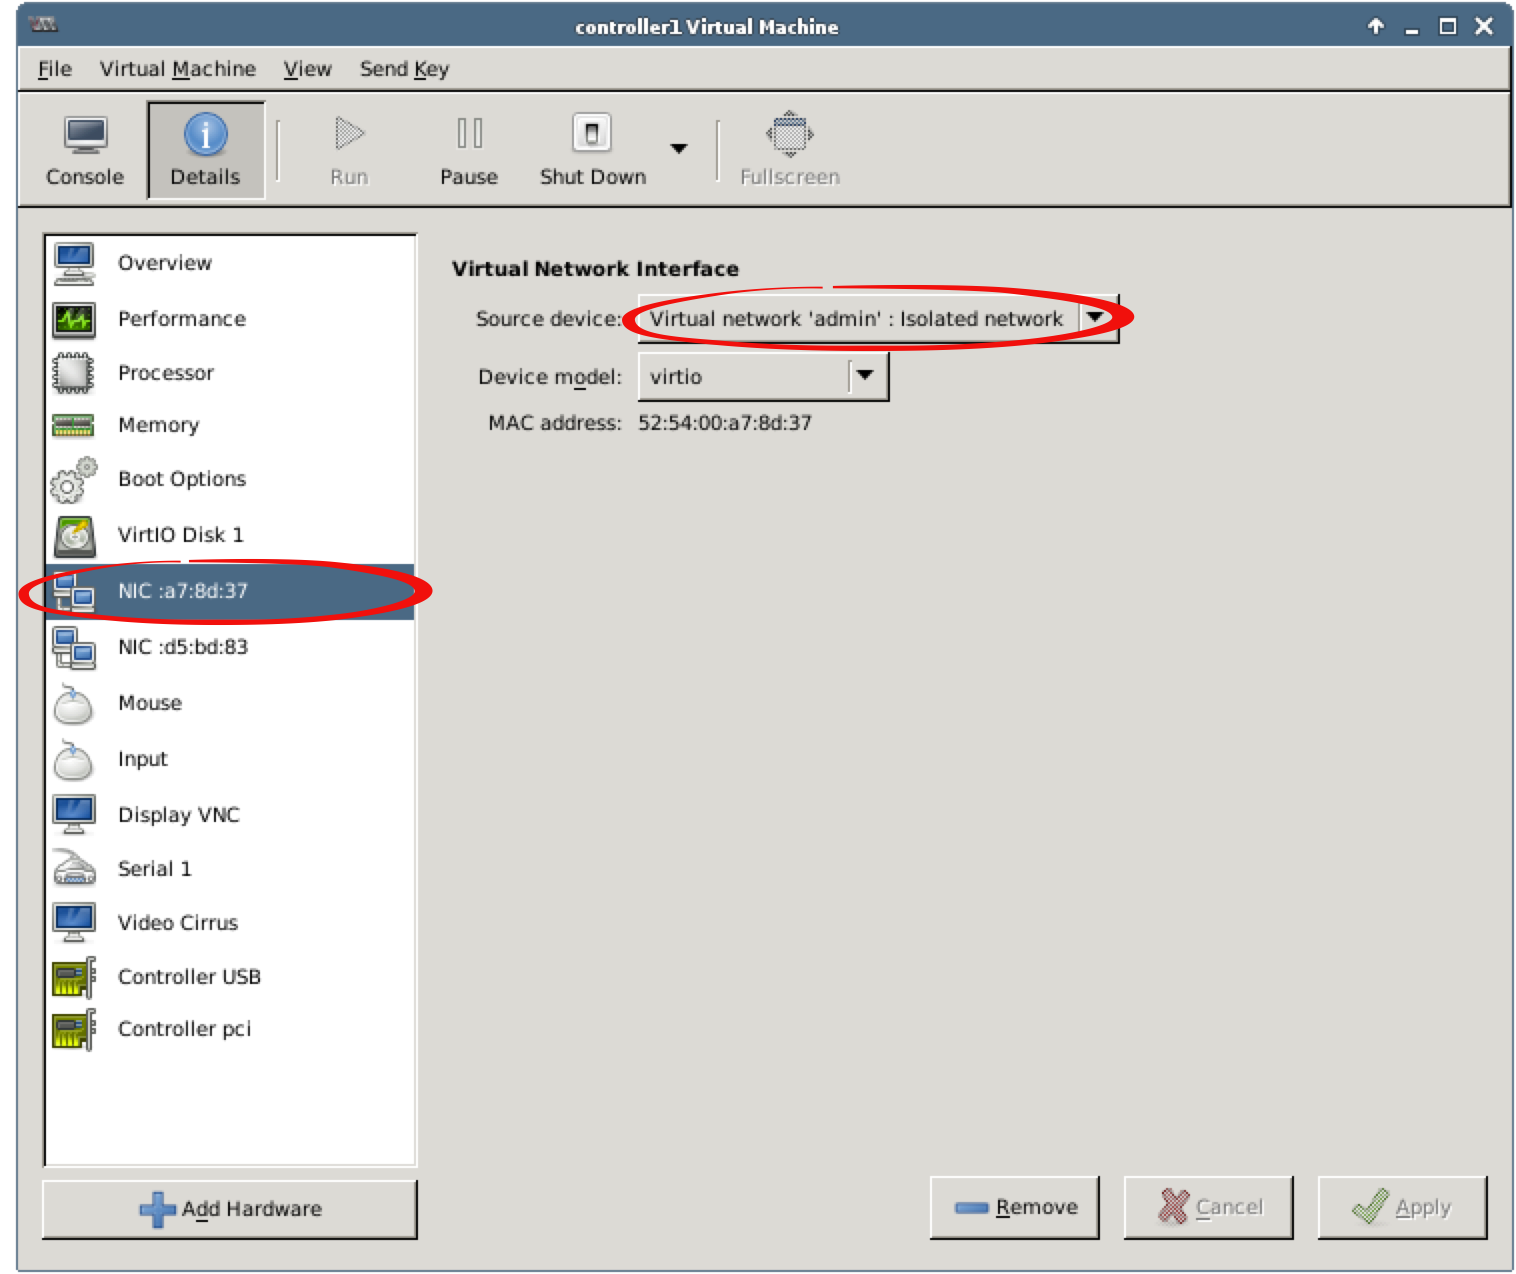
Checkpoint
- How many network interfaces does a controller node have?
- How many network interfaces does a compute node have?
- How many network interfaces does a storage node have?
2.3. Access to the Nodes
There are two ways to log in to the OpenStack nodes:
1. In Virtual Machine Manager, double click on a node and choose the Console tab. Use root for the user name and r00tme for the password to log in to the node. The analogy with a real data center is a direct access to the physical server’s console.
2. All of the nodes are connected to the admin network. You can use ssh to log in to the specified node. By default, the Fuel node is the only node, which is accessible by login and password, other nodes have password authentication disabled for ssh. However, you can use the ssh key, which was generated during the deployment and located on the Fuel node. So you can log in to the Fuel node and then log in to any other node without a password.
Open Terminal Emulator and log in the Fuel node using root for the user name and r00tme for the password:
stack@lab:~$ ssh root@10.20.0.2
The authenticity of host '10.20.0.2 (10.20.0.2)' can't be established.
RSA key fingerprint is 27:7b:0a:a7:10:2e:b5:7b:1a:87:b3:cf:c5:6d:7c:e8.
Are you sure you want to continue connecting (yes/no)? yes
Warning: Permanently added '10.20.0.2' (RSA) to the list of known hosts.
root@10.20.0.2's password:
[root@fuel ~]#
To log in to the node, you should know its IP address. One method to get an IP address for the node is to use Console and get an IP address assigned to eth0 interface using the ifconfig eth0 command. Another method to get an IP address is to use a Fuel command line tool. This method is more convenient, because you are already logged in to the Fuel node. Use the fuel nodes to get a list of nodes and their IP addresses:
[root@fuel ~]# fuel nodes
...
id | status | name             | cluster | ip         | mac               | roles      | pending_roles | online | group_id
---|--------|------------------|---------|------------|-------------------|------------|---------------|--------|---------
7  | ready  | Untitled (d8:60) | 1       | 10.20.0.10 | 52:54:00:19:d8:60 | ceph-osd   |               | True   | 1
4  | ready  | Untitled (b8:09) | 1       | 10.20.0.5  | 42:4b:22:24:a1:cc | controller |               | True   | 1
8  | ready  | Untitled (e2:c6) | 1       | 10.20.0.6  | 0e:92:de:ae:03:0b | compute    |               | True   | 1
3  | ready  | Untitled (06:7d) | 1       | 10.20.0.9  | 42:80:12:ae:a0:6a | ceph-osd   |               | True   | 1
5  | ready  | Untitled (8d:37) | 1       | 10.20.0.3  | 52:54:00:a7:8d:37 | controller |               | True   | 1
2  | ready  | Untitled (a7:9c) | 1       | 10.20.0.7  | 52:54:00:82:a7:9c | compute    |               | True   | 1
6  | ready  | Untitled (27:63) | 1       | 10.20.0.4  | 1a:13:44:69:2f:17 | controller |               | True   | 1
1  | ready  | Untitled (eb:67) | 1       | 10.20.0.8  | 46:f8:e4:9b:ad:d6 | ceph-osd   |               | True   | 1
Choose a node you want to log in. Let’s say you choose the controller node, then its IP address is 10.20.0.4. Use this IP address to log in:
[root@fuel ~]# ssh 10.20.0.4
Warning: Permanently added '10.20.0.4' (RSA) to the list of known hosts.
Welcome to Ubuntu 14.04.3 LTS (GNU/Linux 3.13.0-67-generic x86_64)

 * Documentation:  https://help.ubuntu.com/
root@node-6:~#
2.4. Launch an Instance
Before making experiments with the existing highly available OpenStack environment, let’s create a simple test instance and provide an access to it from the public network.
2.4.1. Launch an Instance via Horizon
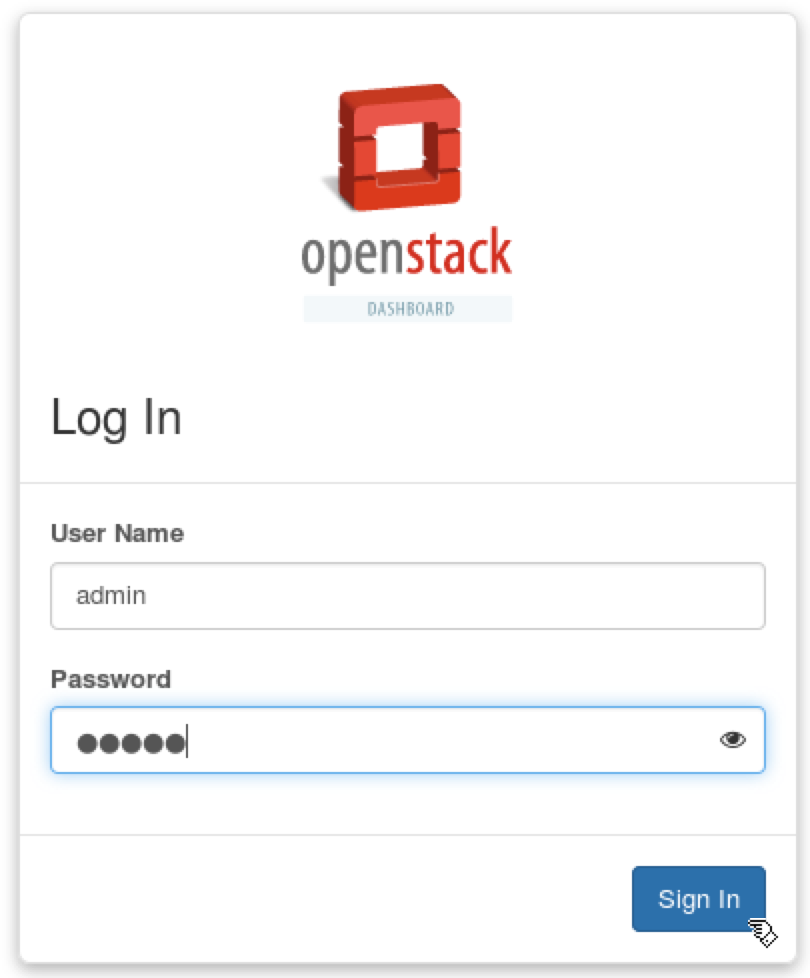
Step 1 Start Firefox and open the following link: https://172.16.0.3. Use name admin and password admin to log in. Firefox will complain about using the untrusted connection, see 1.5. Working with Firefox for a workaround.
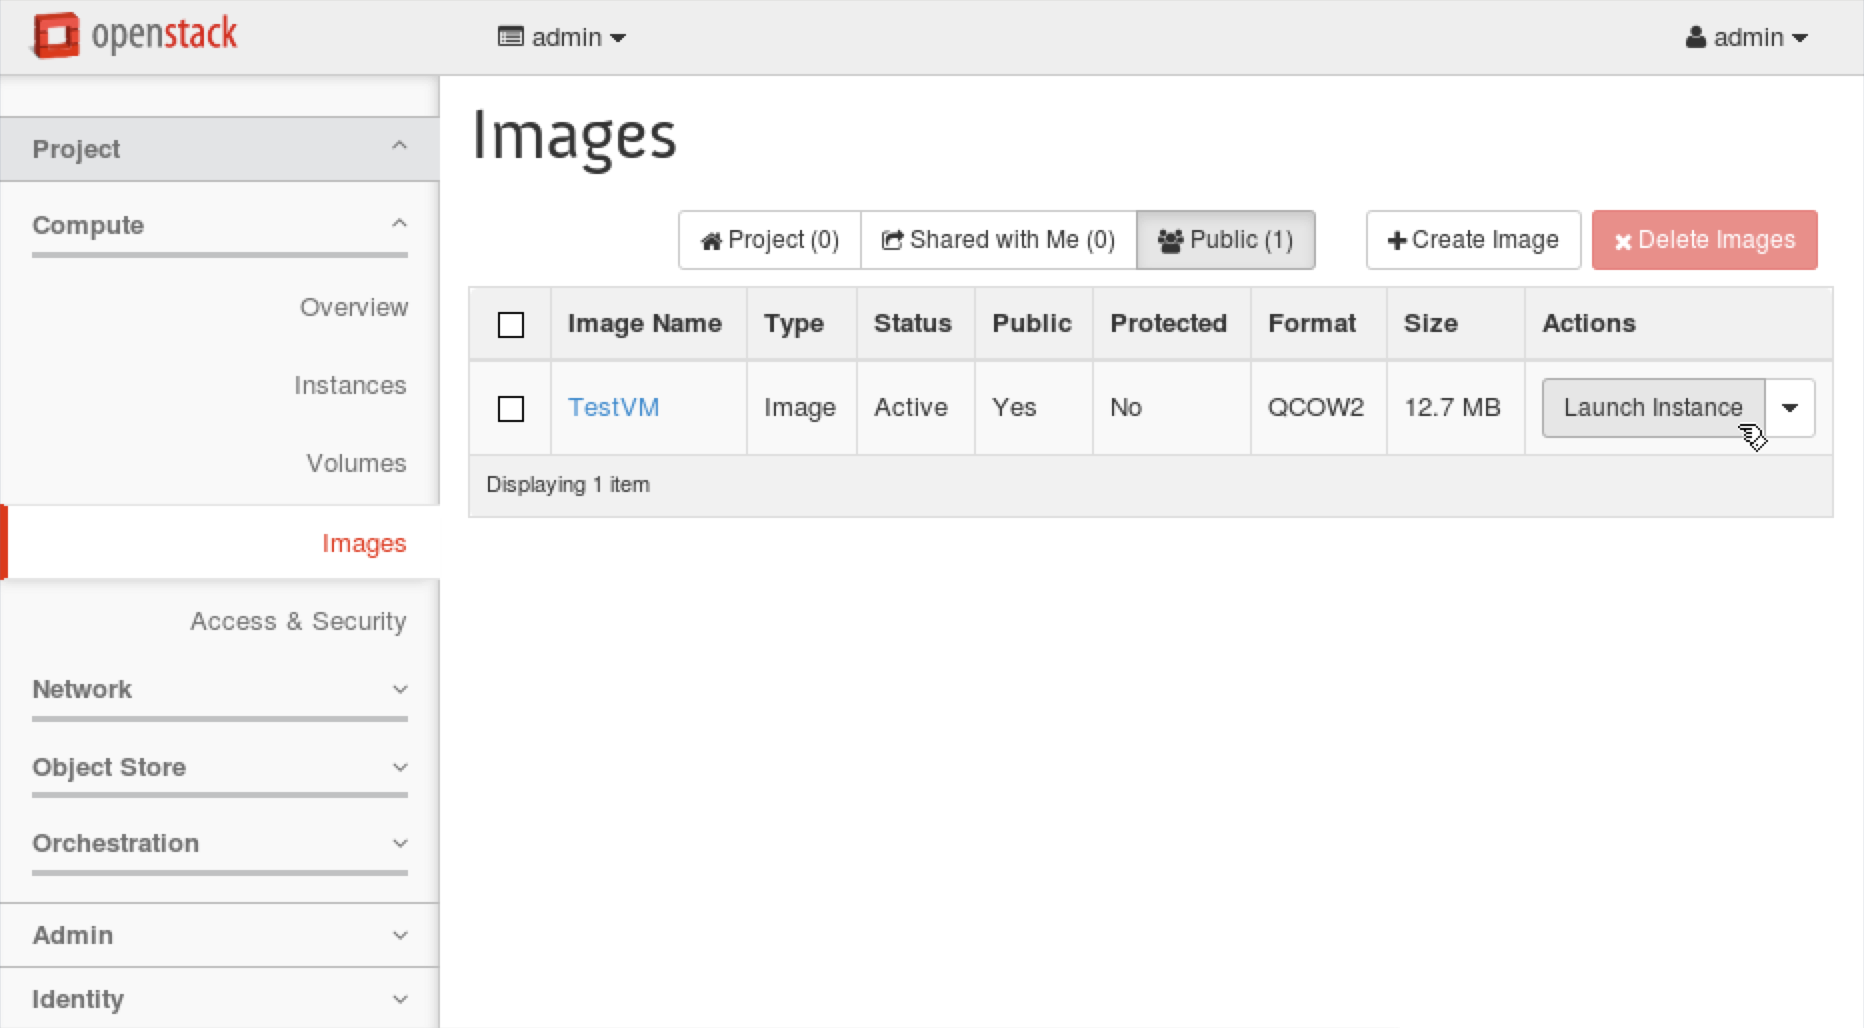
Step 2 From the navigation menu choose Project, Images. Press Launch Instance for the TestVM image.
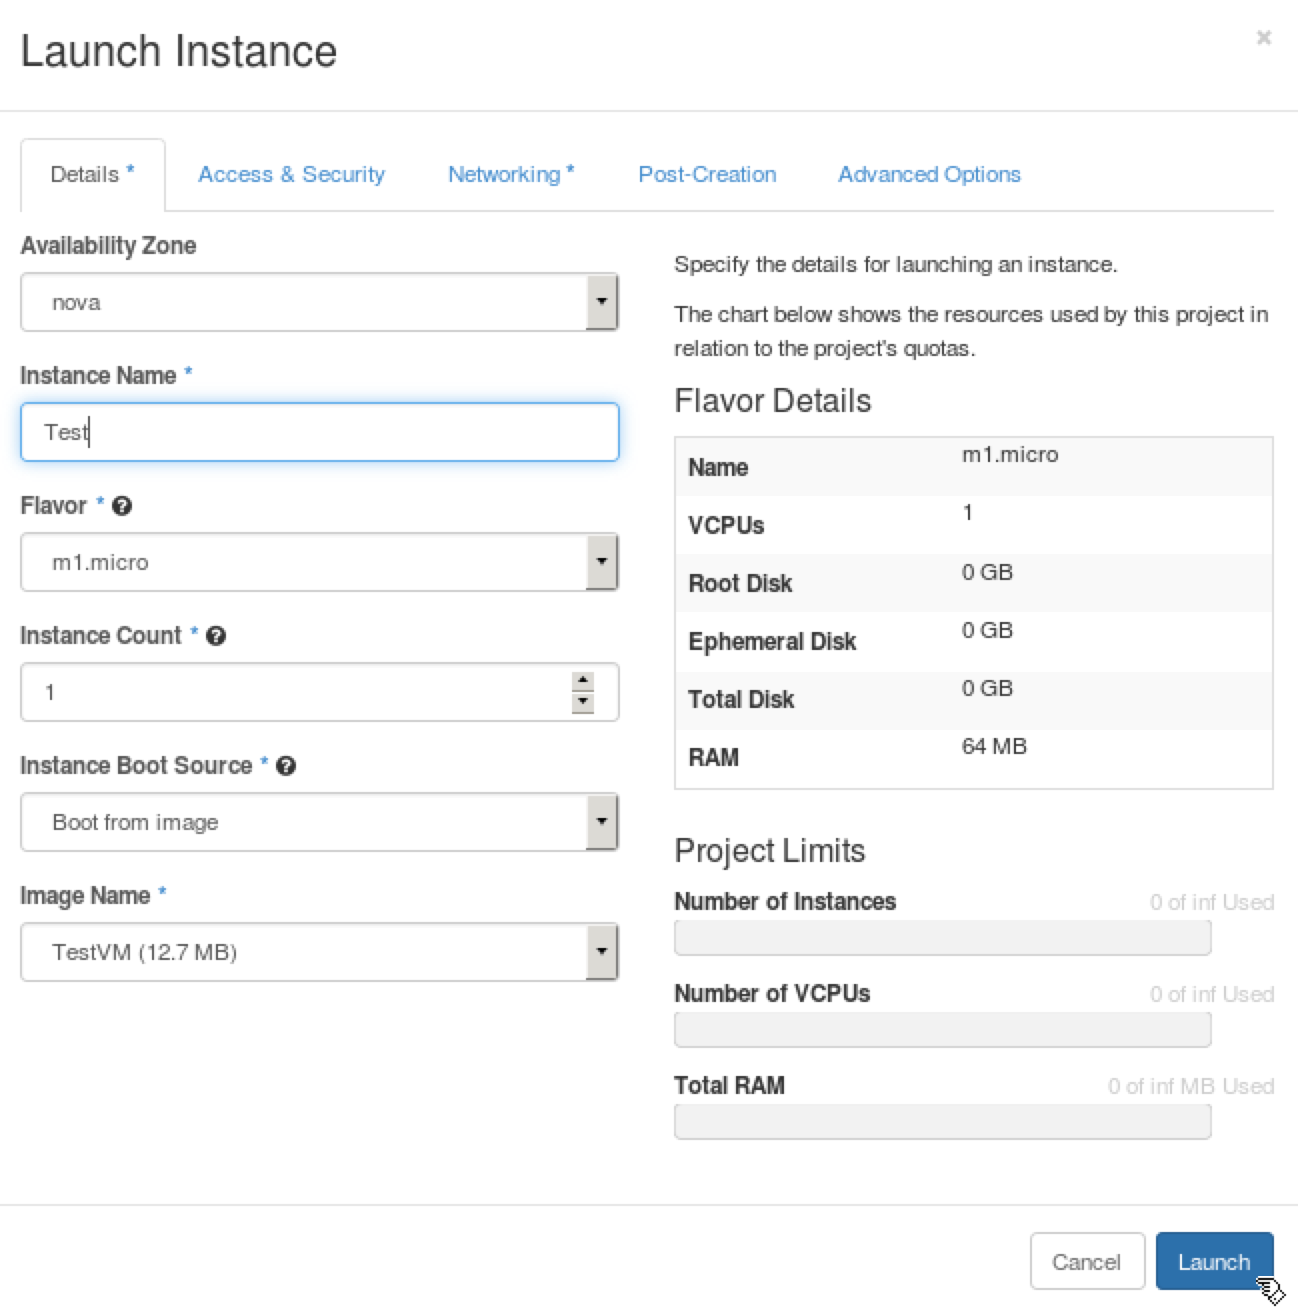
Step 3 Enter, Test to the Instance Name field.
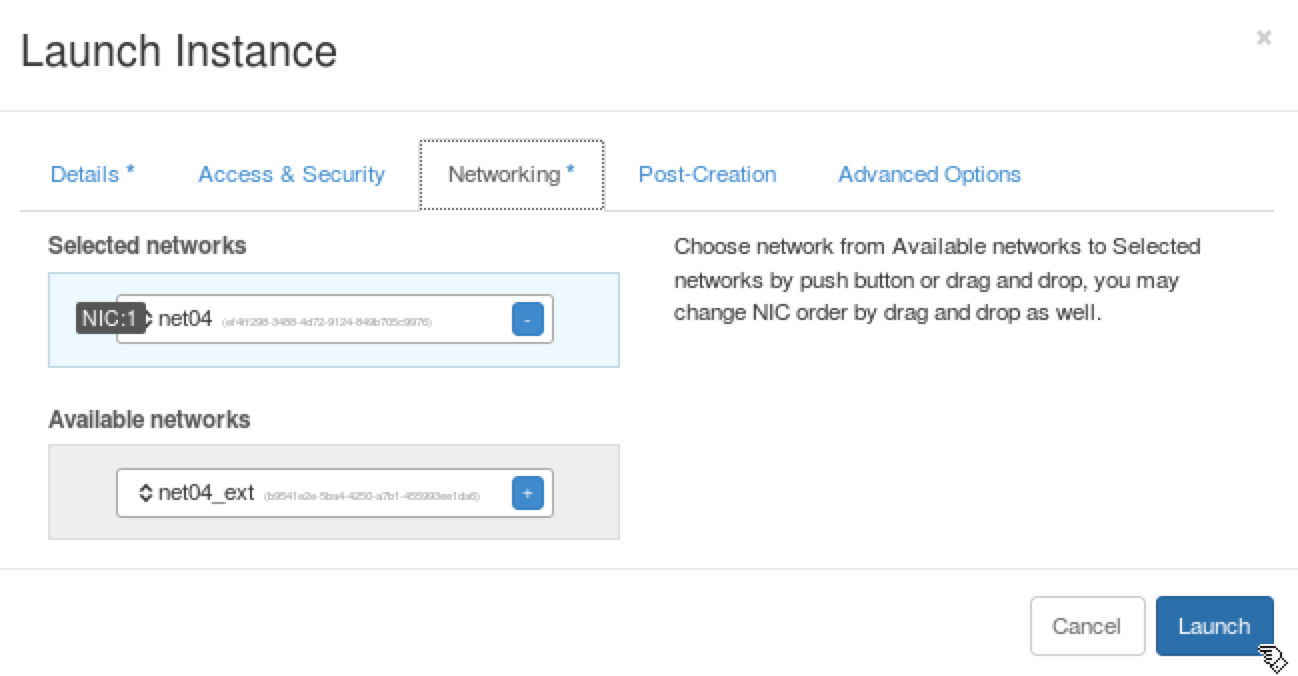
Step 4 Choose the Networking tab, press + near net04 network to select the network. Press Launch to launch a VM.
Step 5 Horizon should show the instance as Running. From Actions choose View Log.
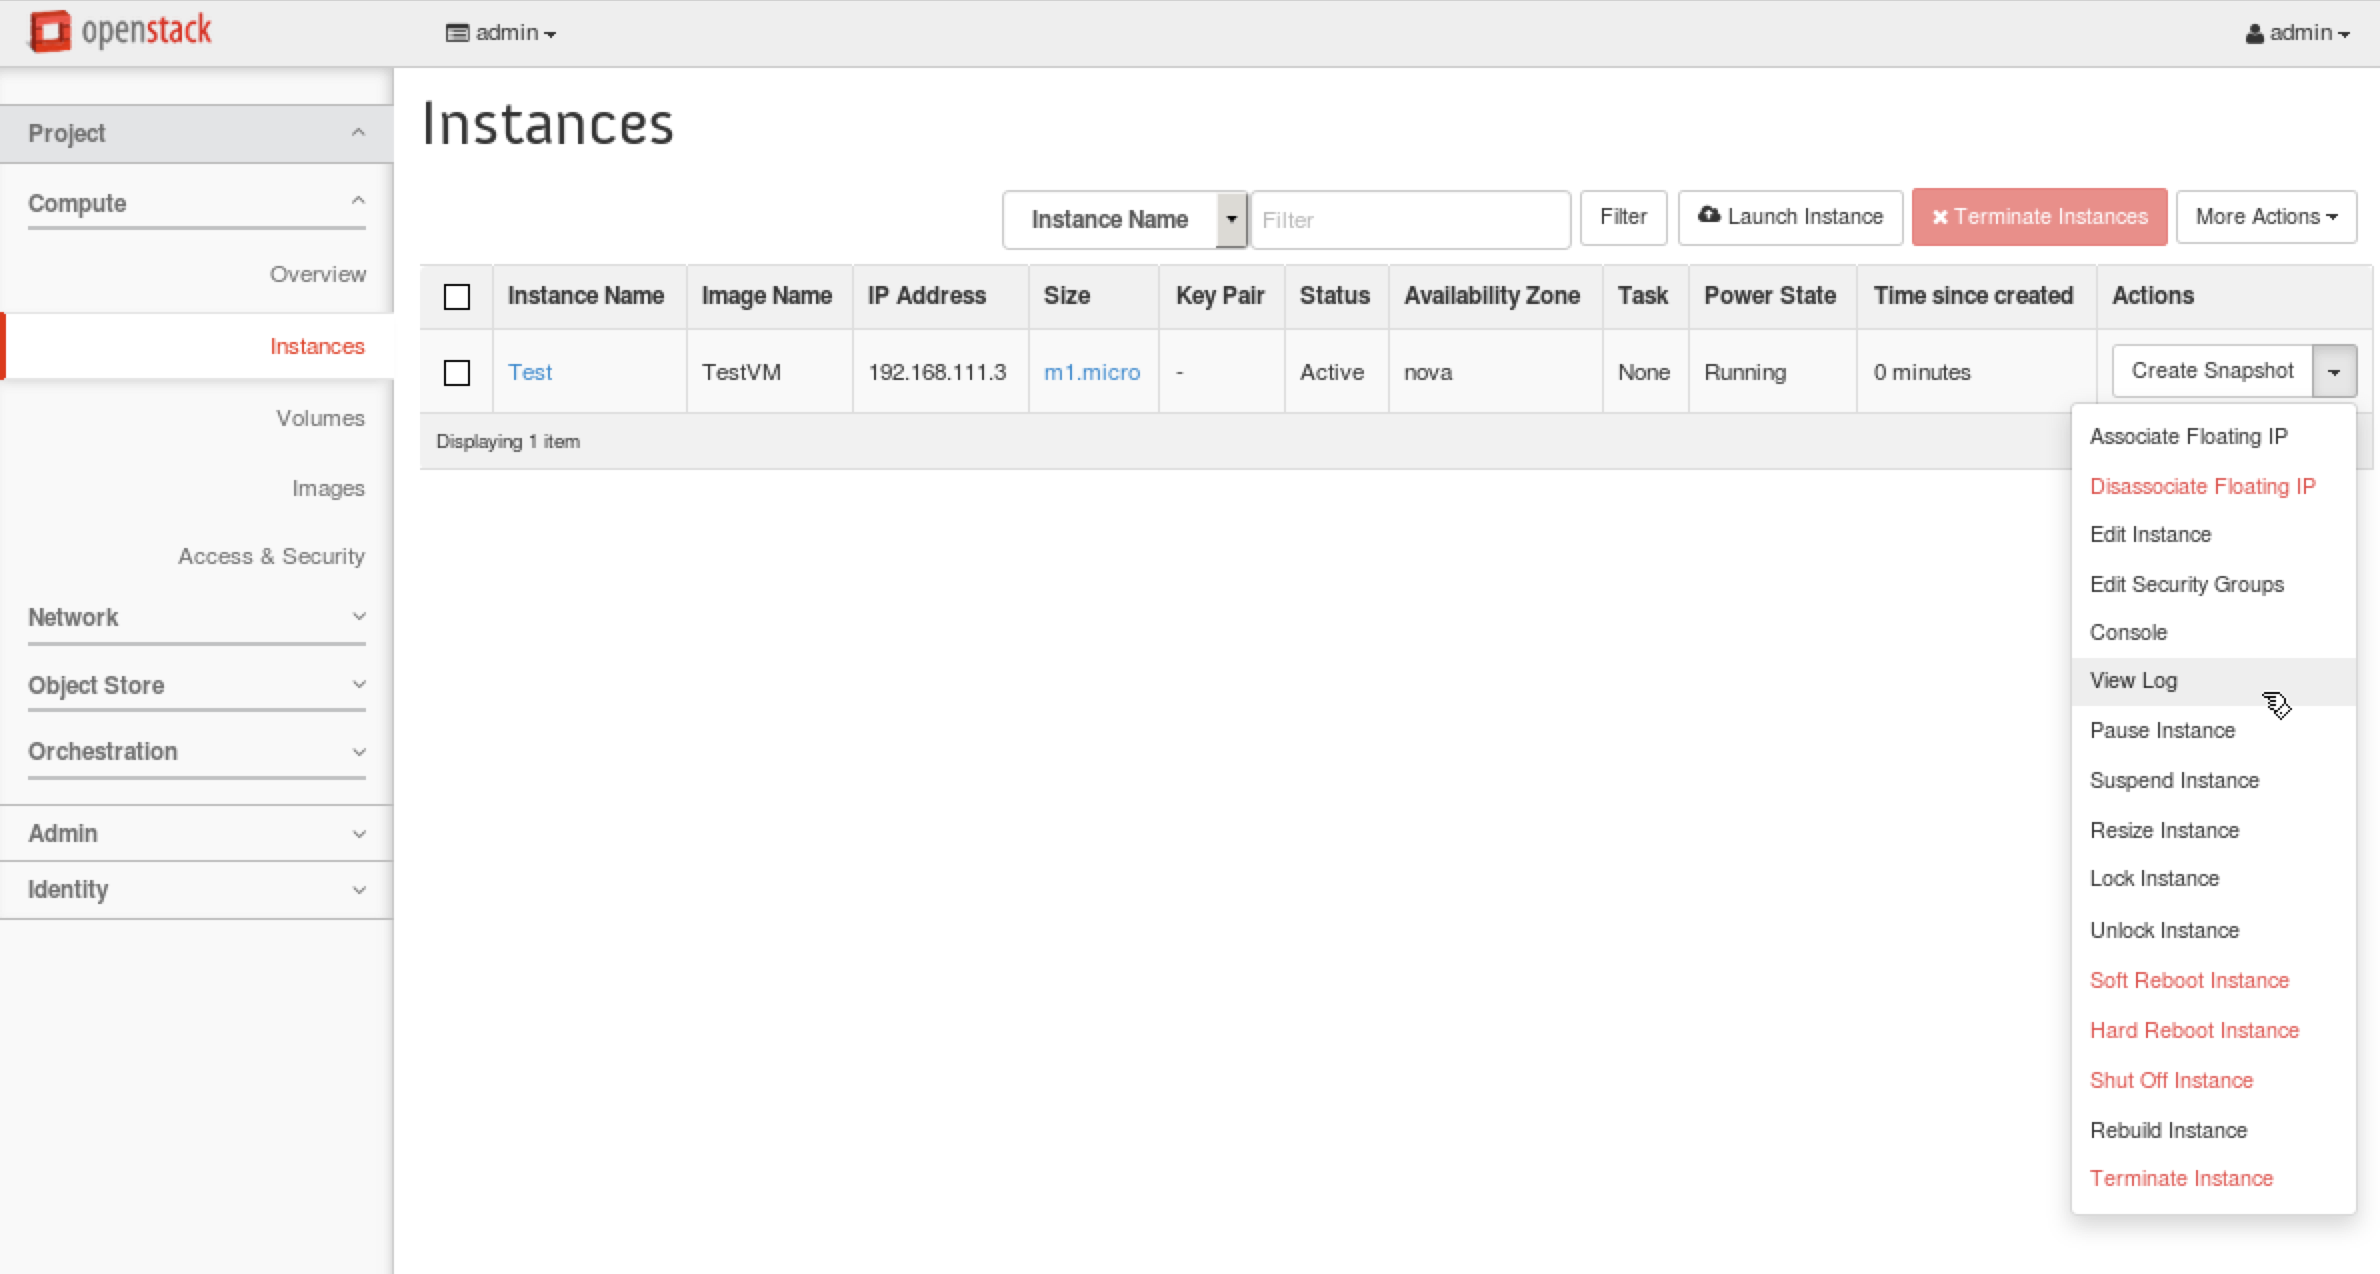
Check the log to make sure that VM has booted. The last message in the log should be the login prompt, such as test login:. You may need to refresh the log, if the VM is still booting.
2.4.2. Access the Test Instance via Console
From the navigation menu choose Project, Instances. From Actions choose Console to open VM console. Press Click here to show only console. Firefox will complain about using the untrusted connection, see 1.5. Working with Firefox for a workaround. You can log in to the VM using user name cirros and password cubswin:).
2.4.3. Access the Test Instance From the Lab
We want to make the VM accessible from our environment via the public network. To do this, we need the floating IP to be associated with the VM and allow ICMP and SSH traffic.
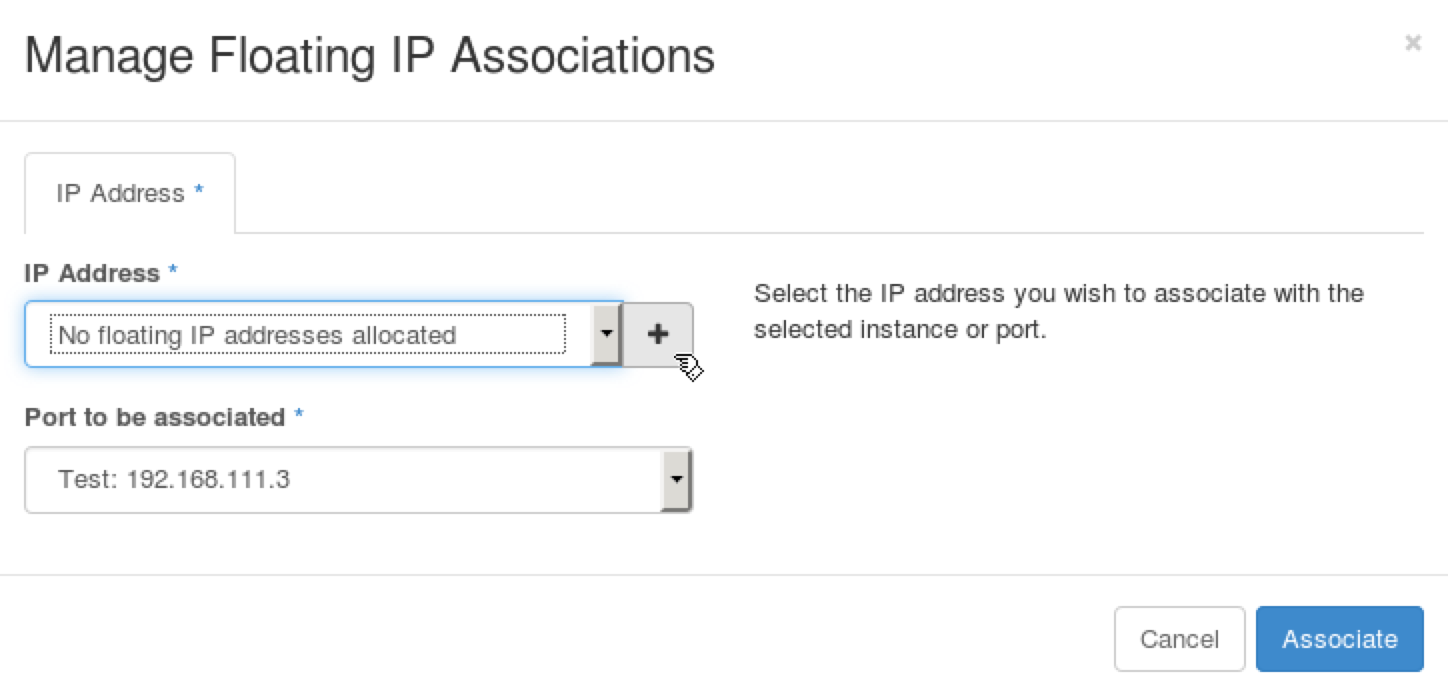
Step 1 From the navigation menu choose Project, Instances. From Actions choose Associate Floating IP. Press + near IP Address field.
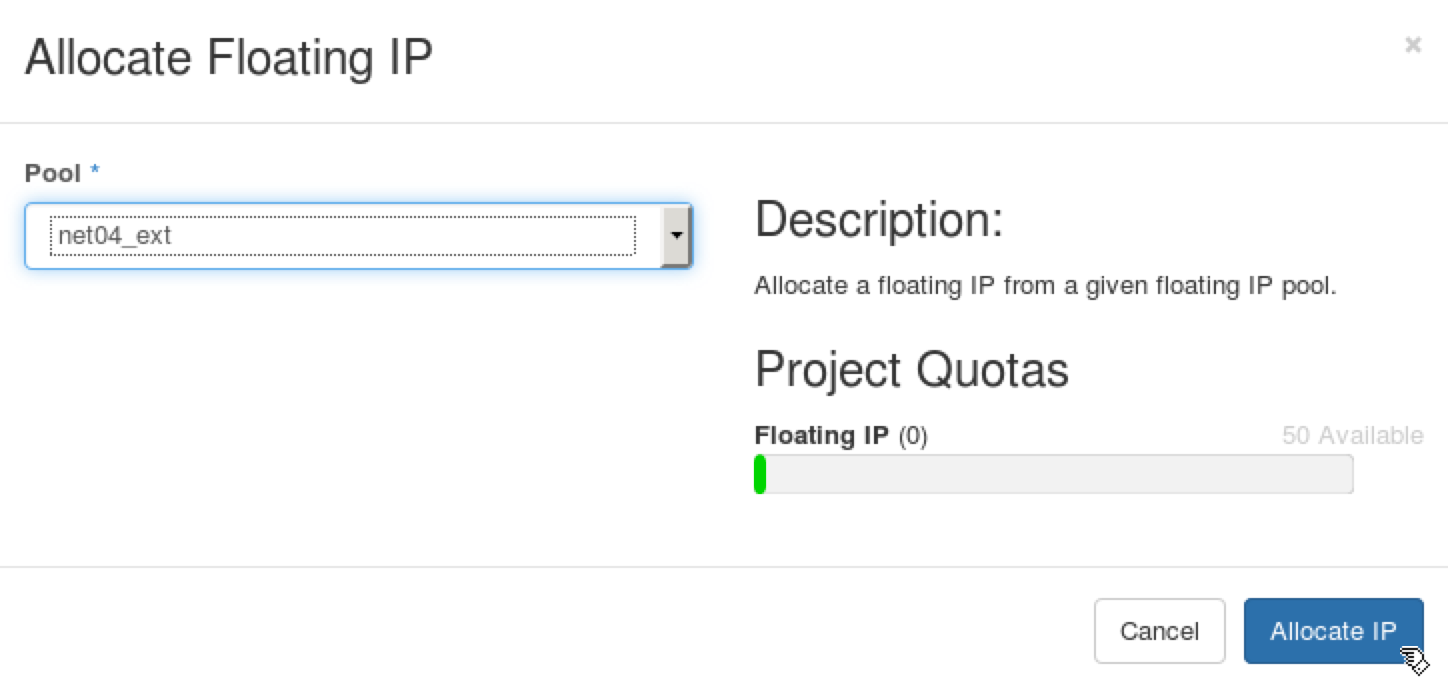
Step 2 Press Allocate IP.
Step 3 Select the recently allocated IP address in the IP Address field and press Associate.
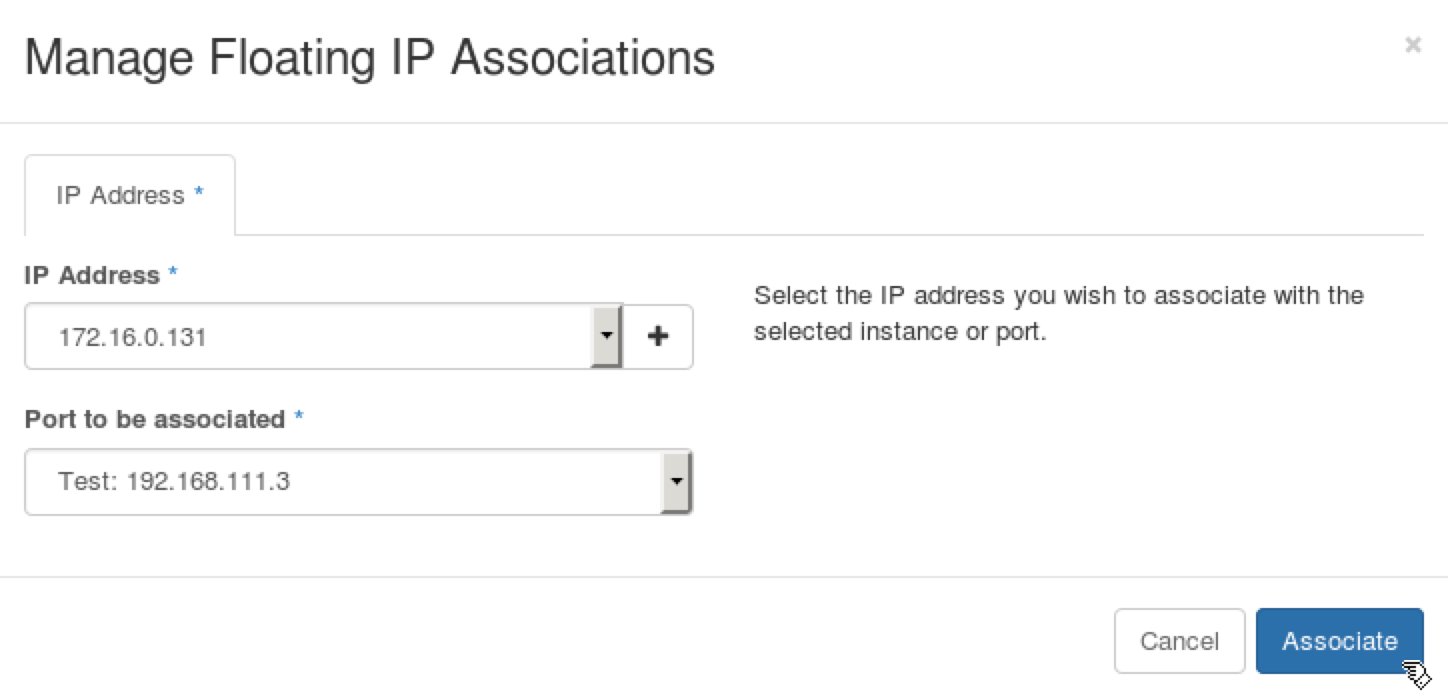
Step 4 From the navigation menu choose Project, Instances. The list should show that the floating IP, for example 172.16.0.131, is associated with the VM.

Step 5 From the navigation menu choose Project, Access & Security. For the default security group press Manage Rules button.
Step 6 Press the Add Rule button. Choose ALL ICMP in the Rule field, Ingress in the Direction field, CIDR in the Remote field, 0.0.0.0/0 in the CIDR field. Press the Add button.
Step 7 Press the Add Rule button. Choose SSH in the Rule field, CIDR in the Remote field, 0.0.0.0/0 in the CIDR field. Press the Add button.
Step 8 Open the Terminal Emulator and check that you can ping the VM through the public network.
stack@lab:~$ ping -c 1 172.16.0.131
PING 172.16.0.131 (172.16.0.131) 56(84) bytes of data.
64 bytes from 172.16.0.131: icmp_seq=1 ttl=63 time=3.77 ms

--- 172.16.0.131 ping statistics ---
1 packets transmitted, 1 received, 0% packet loss, time 0ms
rtt min/avg/max/mdev = 3.771/3.771/3.771/0.000 ms
Step 9 In the Terminal Emulator check that you can log in to the VM using user name cirros and password cubswin:).
stack@lab:~$ ssh cirros@172.16.0.131
The authenticity of host '172.16.0.131 (172.16.0.131)' can't be established.
RSA key fingerprint is 98:5e:f3:67:90:be:33:c8:26:fc:22:3f:0e:c8:ff:e8.
Are you sure you want to continue connecting (yes/no)? yes
Warning: Permanently added '172.16.0.131' (RSA) to the list of known hosts.
cirros@172.16.0.131's password:
$
2.5. Node and Service Failures with HAProxy
In this exercise we will observe how HAProxy is affected by node failures and service failures.
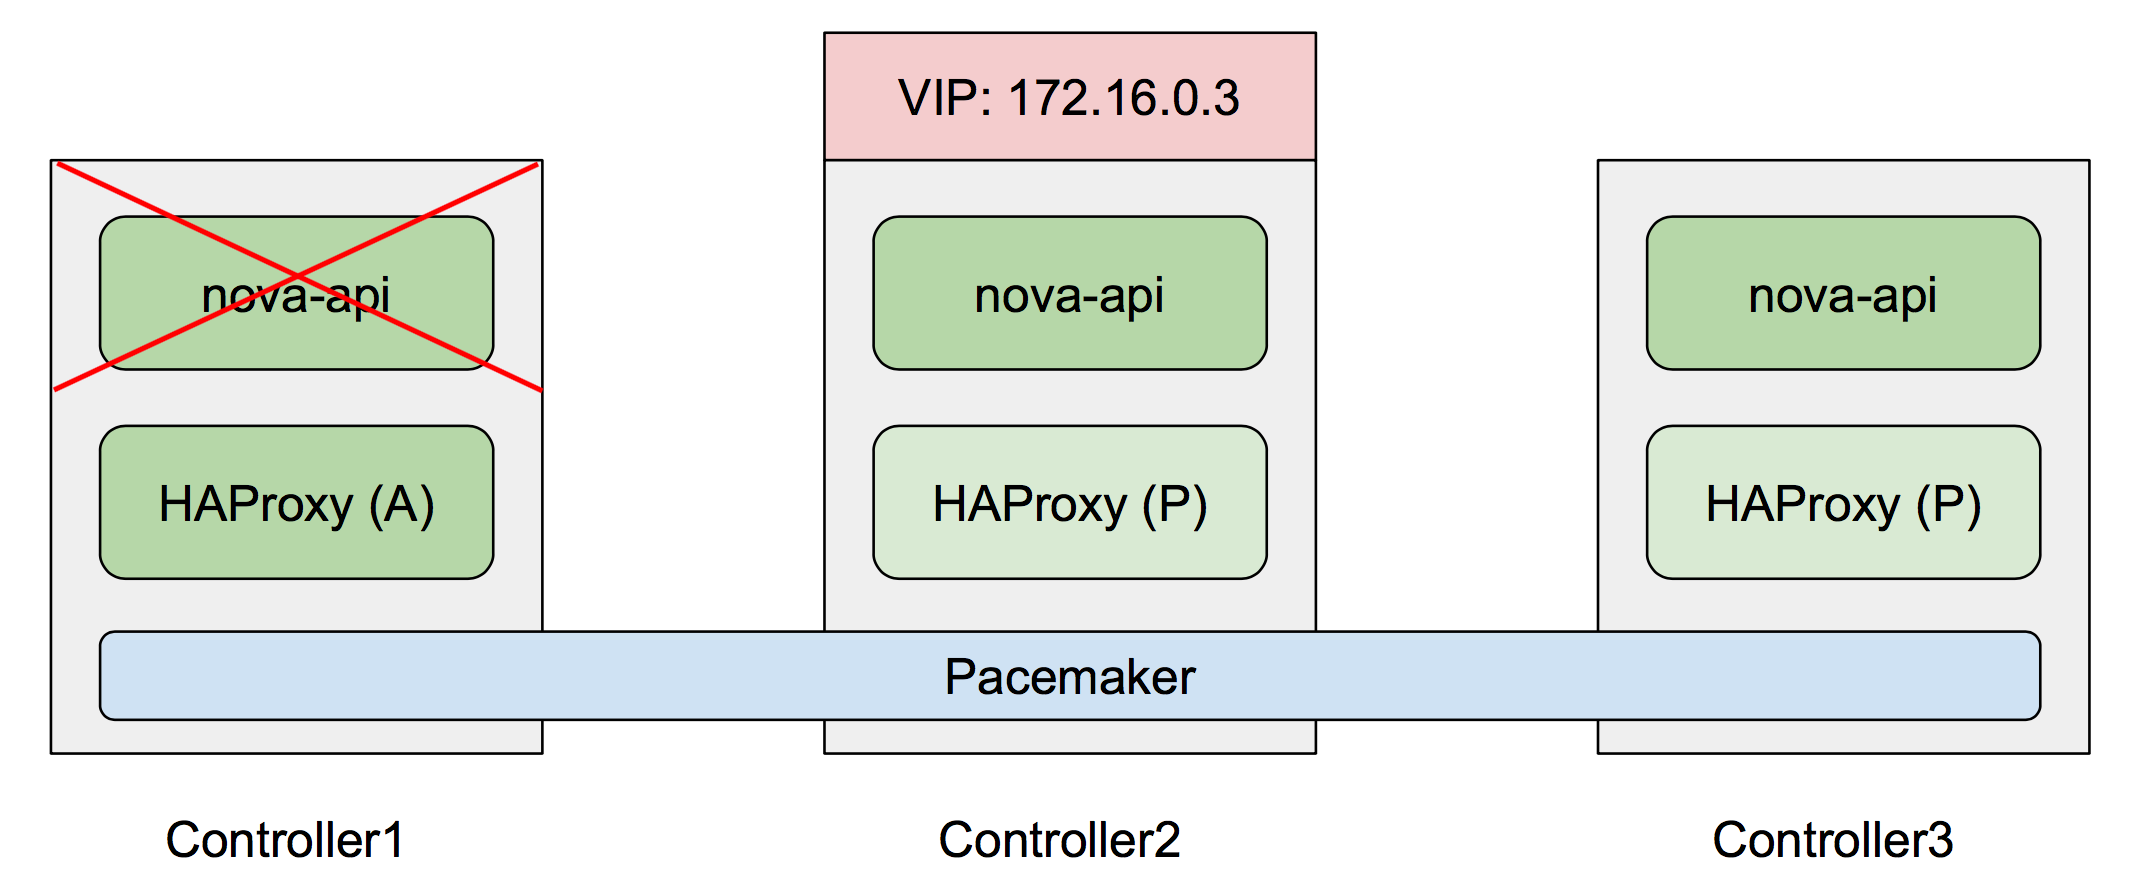
2.5.1. Emulate node failure and observe HAProxy
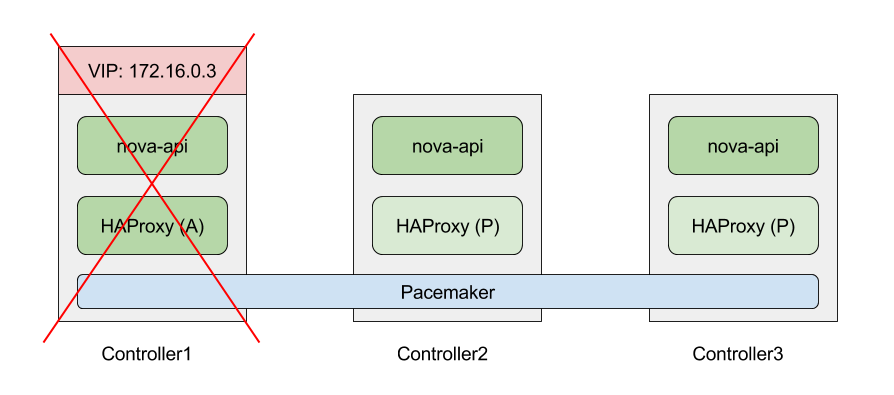
In this segment, we will emulate a controller node failure as demonstrated by the following diagram (services may be omitted in the diagram for simplicity).
Step 1 Launch Virtual Machine Manager, choose controller1 VM, click Open to log-in to its console.

Step 2 View the Virtual IP binding for nova-api in the HAProxy config.
root@node5:~# cat /etc/haproxy/conf.d/040-nova-api-1.cfg

listen nova-api-1
   bind 172.16.0.3:8773 ssl crt /var/lib/astute/haproxy/public_haproxy.pem
   bind 192.168.0.2:8773
   timeout server  600s
   server node-5 192.168.0.4:8773  check
   server node-4 192.168.0.3:8773  check
   server node-6 192.168.0.7:8773  check
The Virtual IP we are looking for is 172.16.0.3
Step 3 Execute the following command to view the HAProxy network namespace. Notice that the Virtual IP resides in this namespace.
root@node5:~# ip netns exec haproxy ip addr show
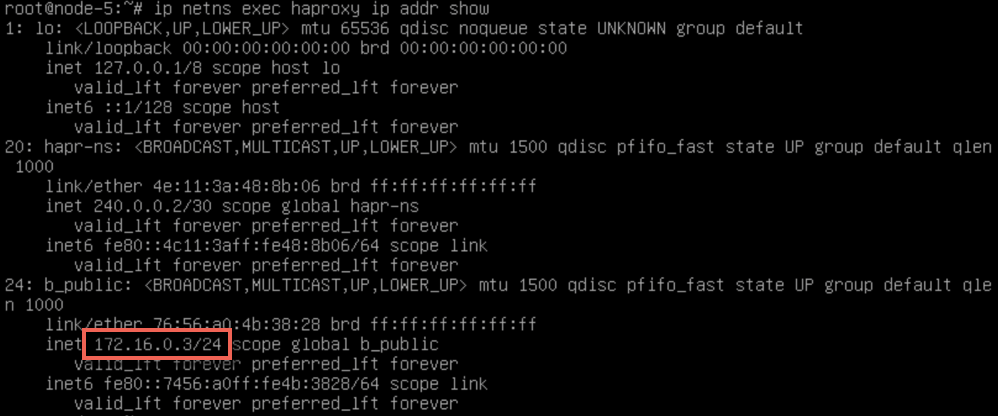
HAProxy services and network interfaces running virtual IP resides in a separate haproxy network namespace. Using a separate namespace forces Linux kernel to treat connections from OpenStack services to HAProxy as remote ones. This ensures proper failover of established connections when the management IP address migrates to another node.
Step 4 Shut down controller1: launch Virtual Machine Manager, choose controller1, press Shut Down, then Force Off (alternatively, you can right click on the controller to open a context menu, choose Shut Down, then Force Off).

Step 5 Check that Horizon is working and the instance is accessible via the network:
stack@lab:~$ ping -c 1 172.16.0.131
PING 172.16.0.131 (172.16.0.131) 56(84) bytes of data.
64 bytes from 172.16.0.131: icmp_seq=1 ttl=63 time=3.77 ms

--- 172.16.0.131 ping statistics ---
1 packets transmitted, 1 received, 0% packet loss, time 0ms
rtt min/avg/max/mdev = 3.771/3.771/3.771/0.000 ms

stack@lab:~$ ssh cirros@172.16.0.131
cirros@172.16.0.131's password:
$
Horizon is still accessible using 172.16.0.3 because a different controller is handling the Virtual IP.
Step 6 Log-in to controller2 and execute the following command to view the HAProxy network namespace.
root@node6:~# ip netns exec haproxy ip addr show
The VIP has been reassigned to controller2 by Pacemaker.
Step 7 Start the controller1 again. Launch the Virtual Machine Manager, choose VM in a shutoff state, press Run (alternatively, you can right click on the controller to open a context menu, then choose Run).
Note that Virtual IP is not reassigned when controller1 comes back up.
2.5.2. Emulate service failure and observe HAProxy
Next, we will take a look at how HAProxy reacts to service level failure as demonstrated by the following diagram.
Step 1 Open the console of controllers 1, 2, and 3. Execute the following commands on all 3 consoles which will look for a GET request in Nova API logs.
root@node5:~# tail -f /var/log/nova/nova-api.log | grep "GET"
root@node6:~# tail -f /var/log/nova/nova-api.log | grep "GET"
root@node7:~# tail -f /var/log/nova/nova-api.log | grep "GET"
Step 2 Open a terminal window and ssh into Fuel node.
stack@lab:~$ ssh root@10.20.0.2
root@10.20.0.2's password: r00tme
Step 3 Log-in to controller1 node.
[root@fuel ~]# ssh 10.20.0.3
Step 4 Invoke a nova command to trigger an API call. View the controllers’ consoles to see which node is responding to the request.
root@node-5:~# source openrc
root@node-5:~# nova list
HAProxy will load balance consecutive requests. As you repeat nova-list you will notice that different controllers will handle the request - which looks like the following.

Step 5 In the terminal connection to controller1, stop the nova-api service.
root@node-5:~# service nova-api stop
nova-api stop/waiting
Step 6 When a service goes down, HAProxy becomes aware of the unreachable service. You can view the notifications by issuing the following command on controller1.
root@node-5:~# cat /var/log/haproxy.log | grep -E 'nova-api|DOWN|node-5'
...
<129>Jul  9 03:03:42 node-5 haproxy[7527]: Server nova-api-1/node-5 is DOWN,
reason: Layer4 connection problem, info: "Connection refused", check duration:
0 ms. 2 active and 0 backup servers left. 0 sessions active, 0 requeued, 0
remaining in queue.
...
This shows activity between node-5 (controller1) and the nova-api service that has been reported as DOWN status.
Step 7 Log-in to controller1 and invoke nova list command. You can observe that the API calls are now only served by controller2 and controller3.
2.6. Emulate Ceph Node Failure
In this environment, Ceph is integrated with Nova so Ceph cluster is is used for ephemeral volumes. Such integration allows using live migration of VMs with ephemeral drives. In this exercise we will emulate a Ceph node failure and we will verify that the VM, which ephemeral drive is stored in Ceph continues to work.
Step 1 Shut down one Ceph node: launch Virtual Machine Manager, choose any Ceph node VM, for example ceph1, press Shut Down, then Force Off (alternatively, you can right click on the Ceph node to open a context menu, choose Shut Down, then Force Off).
Step 2 Check that Horizon is working and the instance is accessible via the network:
stack@lab:~$ ping -c 1 172.16.0.131
PING 172.16.0.131 (172.16.0.131) 56(84) bytes of data.
64 bytes from 172.16.0.131: icmp_seq=1 ttl=63 time=3.77 ms

--- 172.16.0.131 ping statistics ---
1 packets transmitted, 1 received, 0% packet loss, time 0ms
rtt min/avg/max/mdev = 3.771/3.771/3.771/0.000 ms

stack@lab:~$ ssh cirros@172.16.0.131
cirros@172.16.0.131's password:
$
Step 3 Start the Ceph node again. Launch the Virtual Machine Manager, choose VM in a shutoff state, press Run (alternatively, you can right click on the Ceph node to open a context menu, then choose Run).
Step 4 Check that Horizon is working and the instance is accessible via the network.
2.7. Live Migrate an Instance
Note, that although OpenStack can be configured to achieve highly available OpenStack services, the availability for individual guest instances cannot be guaranteed. In this exercise we will emulate a planned maintenance of a compute node. If there are running instances on such compute node, then you need to migrate (evacuate) them to another compute node.
Step 1 Log in to the test instance and run, for example, ping command to see how the instance works during the migration. Keep the command running in a separate window.
$ ping 8.8.8.8
PING 8.8.8.8 (8.8.8.8) 56(84) bytes of data.
64 bytes from 172.16.0.131: icmp_seq=1 ttl=63 time=3.77 ms
...
Step 2 Log in to any controller and execute the following commands to list available VMs:
[root@node-4 ~]# source openrc
[root@node-4 ~]# nova list
+-------------------------+------+--------+-------------+---------------+
| ID                      | Name | Status | Power State | Networks      |
+-------------------------+------+--------+-------------+---------------+
| 4cfe0dfb-f28f-43e9-.... | vm   | ACTIVE | Running     | 10.0.0.2      |
+-------------------------+------+--------+-------------+---------------+
Step 3 Determine which host the instance is running on:
[root@node-4 ~]# nova show <VM-ID>
+--------------------------------------+--------------------------------+
| Property                             | Value                          |
+--------------------------------------+--------------------------------+
| OS-EXT-SRV-ATTR:host                 | node-2.domain.tld              |
+--------------------------------------+--------------------------------+
Step 4 List the available compute nodes and choose the host you want to migrate the instance to:
[root@node-4 ~]# nova host-list
+-------------------+-------------+----------+
| host_name         | service     | zone     |
+-------------------+-------------+----------+
| node-2.domain.tld | compute     | nova     |
| node-3.domain.tld | compute     | nova     |
+-------------------+-------------+----------+
Step 5 Migrate the instance to a new host
[root@node-4 ~]# nova live-migration <VM-ID> <DEST-HOST-NAME>
Step 6 Show the VM details and check its status
[root@node-4 ~]# nova show <VM-ID>
+--------------------------------------+----------------------------+
| Property                             | Value                      |
+--------------------------------------+----------------------------+
| OS-EXT-SRV-ATTR:host                 | node-3.domain.tld          |
+--------------------------------------+----------------------------+
2.8. Shut Down the Fuel node
Fuel is the only node, which does not have redundant nodes. However, this does not affect the availability of OpenStack. As we mentioned before, Fuel was used to deploy the existing OpenStack environment. After the deployment Fuel can be safely turned off.
In this exercise we will turn the Fuel node off and verify that the OpenStack environment still works.
Step 1 Shut down the Fuel node: launch Virtual Machine Manager, choose fuel, press Shut Down, then Force Off (alternatively, you can right click on the Fuel node to open a context menu, choose Shut Down, then Force Off).
Step 2 Check that Horizon is working and the instance is accessible via the network:
stack@lab:~$ ping -c 1 172.16.0.131
PING 172.16.0.131 (172.16.0.131) 56(84) bytes of data.
64 bytes from 172.16.0.131: icmp_seq=1 ttl=63 time=3.77 ms

--- 172.16.0.131 ping statistics ---
1 packets transmitted, 1 received, 0% packet loss, time 0ms
rtt min/avg/max/mdev = 3.771/3.771/3.771/0.000 ms

stack@lab:~$ ssh cirros@172.16.0.131
cirros@172.16.0.131's password:
$
Step 3 Start the Fuel node again. Launch the Virtual Machine Manager, choose VM in a shutoff state, press Run (alternatively, you can right click on the Fuel node to open a context menu, then choose Run).
Step 4 Check that Horizon is working and the instance is accessible via the network.
Congratulations! You have successfully explored a highly available OpenStack environment.
Checkpoint
- OpenStack nodes and networks in the existing environment
- Access the OpenStack nodes
- Launch a test instance
- Emulate a controller node failure
- Emualte a storage node failure
- Live-migrate the instance
- Shut down the Fuel node
![]()
Table Of Contents
- 1. Classroom Environment
- 2. Explore HA OpenStack
- 3. Fuel Installation
- 4. Simple Deployment
- 5. HA Deployment
- 6. OpenStack Networking
- 7. Fuel Troubleshooting
- 8. Fuel Plugins
- 9. OpenStack with Ceph
- 10. Murano
- 11. Sahara