8. Fuel Plugins
In this chapter, you will create a new Fuel plugin using the Fuel Plugin Builder and deploy a simple OpenStack environment with a newly created plugin.
| Chapter Details | |
|---|---|
| Chapter Goal | Create a new Fuel plugin and deploy OpenStack environment with it. |
| Chapter Sections | |
8.1. Prerequisites
Check that the following prerequisites have been met:
- You have access to the lab environment.
- You have created all of the required virtual networks (3.2. Create Virtual Networks)
- You have successfully installed the Fuel Master node (3.4. Install Fuel)
- Fuel Master node is up and running
- Fuel Master node is connected to the Internet (3.5. Check Fuel Installation)
8.2. Delete the Existing OpenStack Environment
You will need to create a new OpenStack environment. Before deploying a new one with plugin you will need to tear down the existing environment. If you don’t have an OpenStack environment, skip this section.
To delete the existing environment, follow the steps from section 9.2. Delete the Existing OpenStack Environment.
8.3. Create Controller and Compute Nodes
To deploy an OpenStack environment with Fuel plugin, you will need controller and compute nodes.
Name:       controller
CPUs:       2
RAM:        4096MB
Disk:       60GB
Network 1:  Virtual network 'admin'  : Isolated
Network 2:  Virtual network 'public' : NAT
Name:       compute
CPUs:       2
RAM:        4096MB
Disk:       60GB
Network 1:  Virtual network 'admin'  : Isolated
Network 2:  Virtual network 'public' : NAT
Create new VMs or edit existing VMs using the above specifications. The required steps are similar to the steps from 4.2.1. Create Controller Node or 4.2.2. Create Compute Node sections.
Finally, Fuel should have discovered 2 nodes.
8.4. Install Fuel Plugins Builder
Fuel Plugin Builder is a tool for creating and building plugins for Fuel. It provides an initial template for Fuel plugin. Fuel Plugin Builder also validates your plugin and shows any errors in configuration. You may use any Debian based or Red Hat operating system as an environment for creating plugins. In this section, you will use Fuel Master node to create and build a simple plugin. First, you will need to log in to the Fuel Master node and install Fuel Plugin Builder.
Step 1 Log in to Fuel Master node as root using r00tme as the password.
$ ssh root@10.20.0.2
[root@fuel ~]#
Step 2 To install dependencies, execute the following command:
[root@fuel ~]# yum install createrepo rpm rpm-build dpkg-devel
Step 3 You will need pip (Python package manager) to install the Fuel Plugin Builder. By default, pip is installed on the Fuel Master node. You may need to install it on other systems. To install the Fuel Plugin Builder, execute the following command:
[root@fuel ~]# pip install fuel-plugin-builder==3.0.0
8.5. Create and Build Fuel Plugin
You will create a simple Fuel plugin that creates a file on each target node.
Step 1 Create the plugin’s template. Execute the following command:
[root@fuel ~]# fpb --create myplugin
Fuel Plugin Builder will create a directory myplugin in the current directory. The directory has the following structure:
monitorix/
    deployment_scripts/       # folder where to place your deployment scripts
        deploy.sh             # sample deployment shell script
    deployment_tasks.yaml     # configurations file of deployment tasks
    environment_config.yaml   # custom input fields for your plugin
    LICENSE
    metadata.yaml             # metadata of plugin, e.g. name, description
    network_roles.yaml
    node_roles.yaml
    pre_build_hook
    README.md
    repositories/
        centos/
        ubuntu/
    volumes.yaml
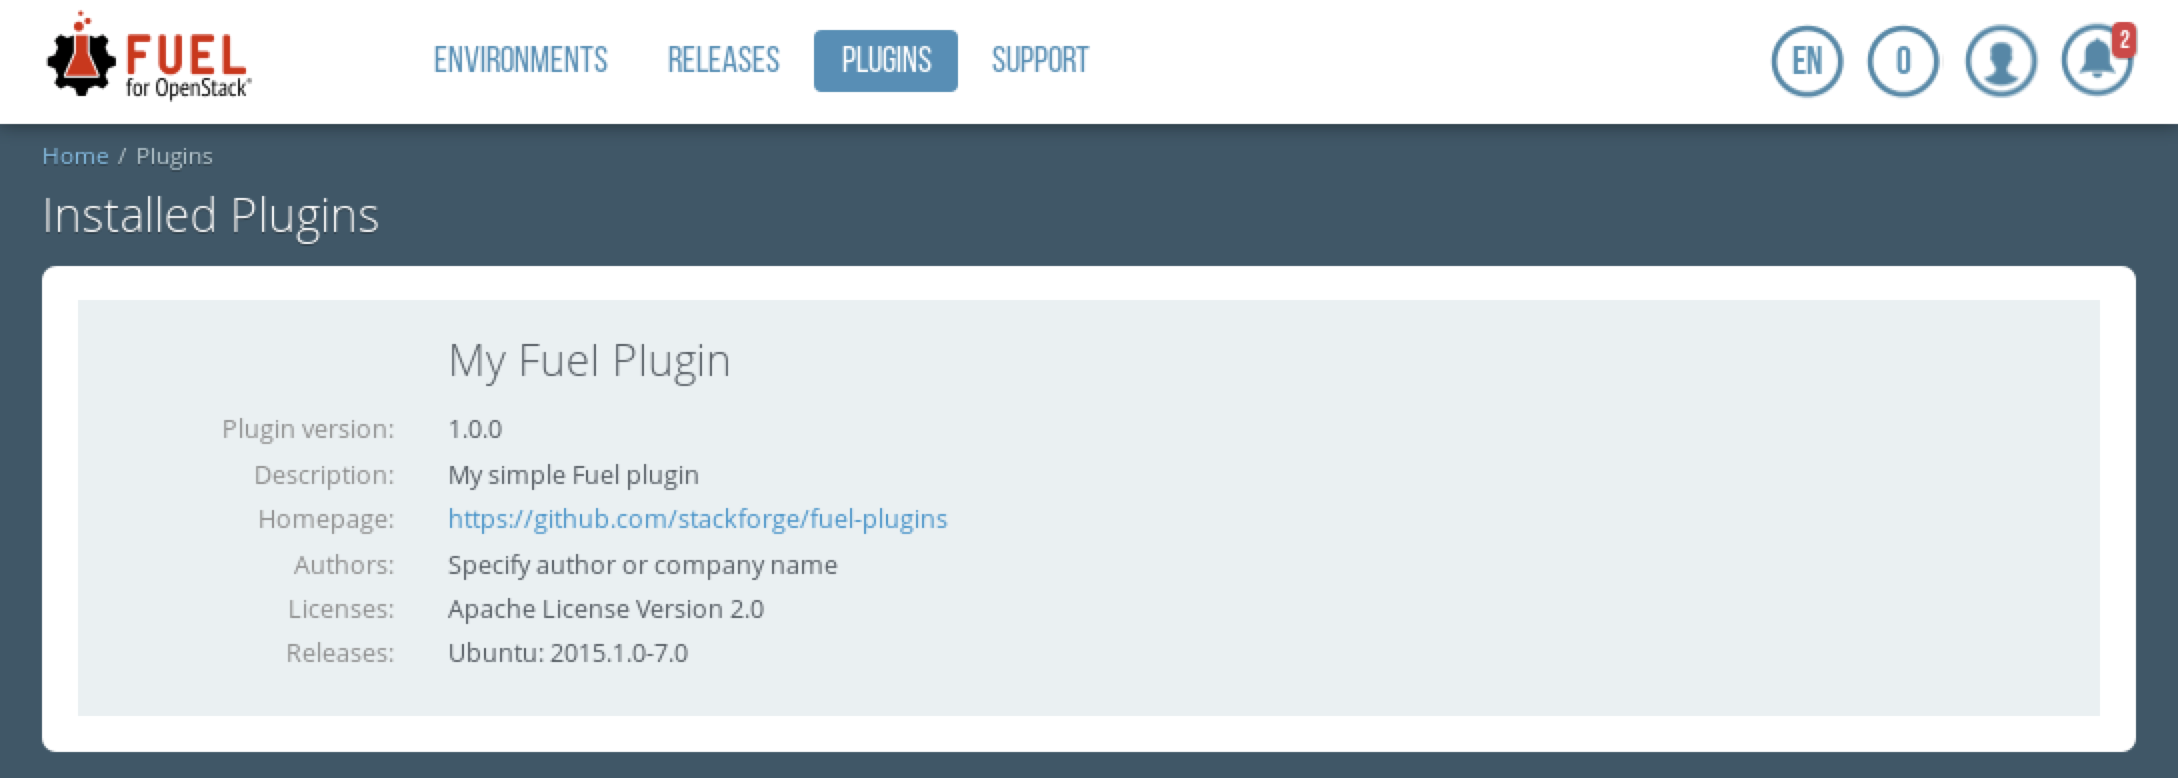
Step 2 Define the plugin’s metadata. Edit the title and description parameters in the myplugin/metadata.yaml file. Keep default values for all of the other fields:
# Plugin name
name: myplugin
# Human-readable name for your plugin
title: My Fuel Plugin
# Plugin version
version: '1.0.0'
# Description
description: My simple Fuel plugin
# Required fuel version
fuel_version: ['7.0']
# Specify license of your plugin
licenses: ['Apache License Version 2.0']
# Specify author or company name
authors: ['Specify author or company name']
# A link to the plugin's page
homepage: 'https://github.com/stackforge/fuel-plugins'
# Specify a group which your plugin implements, possible options:
# network, storage, storage::cinder, storage::glance, hypervisor
groups: []

# The plugin is compatible with releases in the list
releases:
  - os: ubuntu
    version: 2015.1.0-7.0
    mode: ['ha']
    deployment_scripts_path: deployment_scripts/
    repository_path: repositories/ubuntu

# Version of plugin package
package_version: '3.0.0'
Step 3 Define the plugin’s deployment tasks. Edit the myplugin/deployment_task.yaml file:
- id: myplugin-post-deployment-sh
  type: shell
  role: "*"
  required_for: [post_deployment_end]
  requires: [post_deployment_start]
  parameters:
    cmd: echo "myplugin post deployment task executed" >> /tmp/myplugin.log
    retries: 3
    interval: 20
    timeout: 180
You have defined a task for the post deployment stage. This task has a type parameter set to shell to execute shell command, specified by the cmd parameter. The parameter role has been set to "*", so the tasks will be executed for every node.
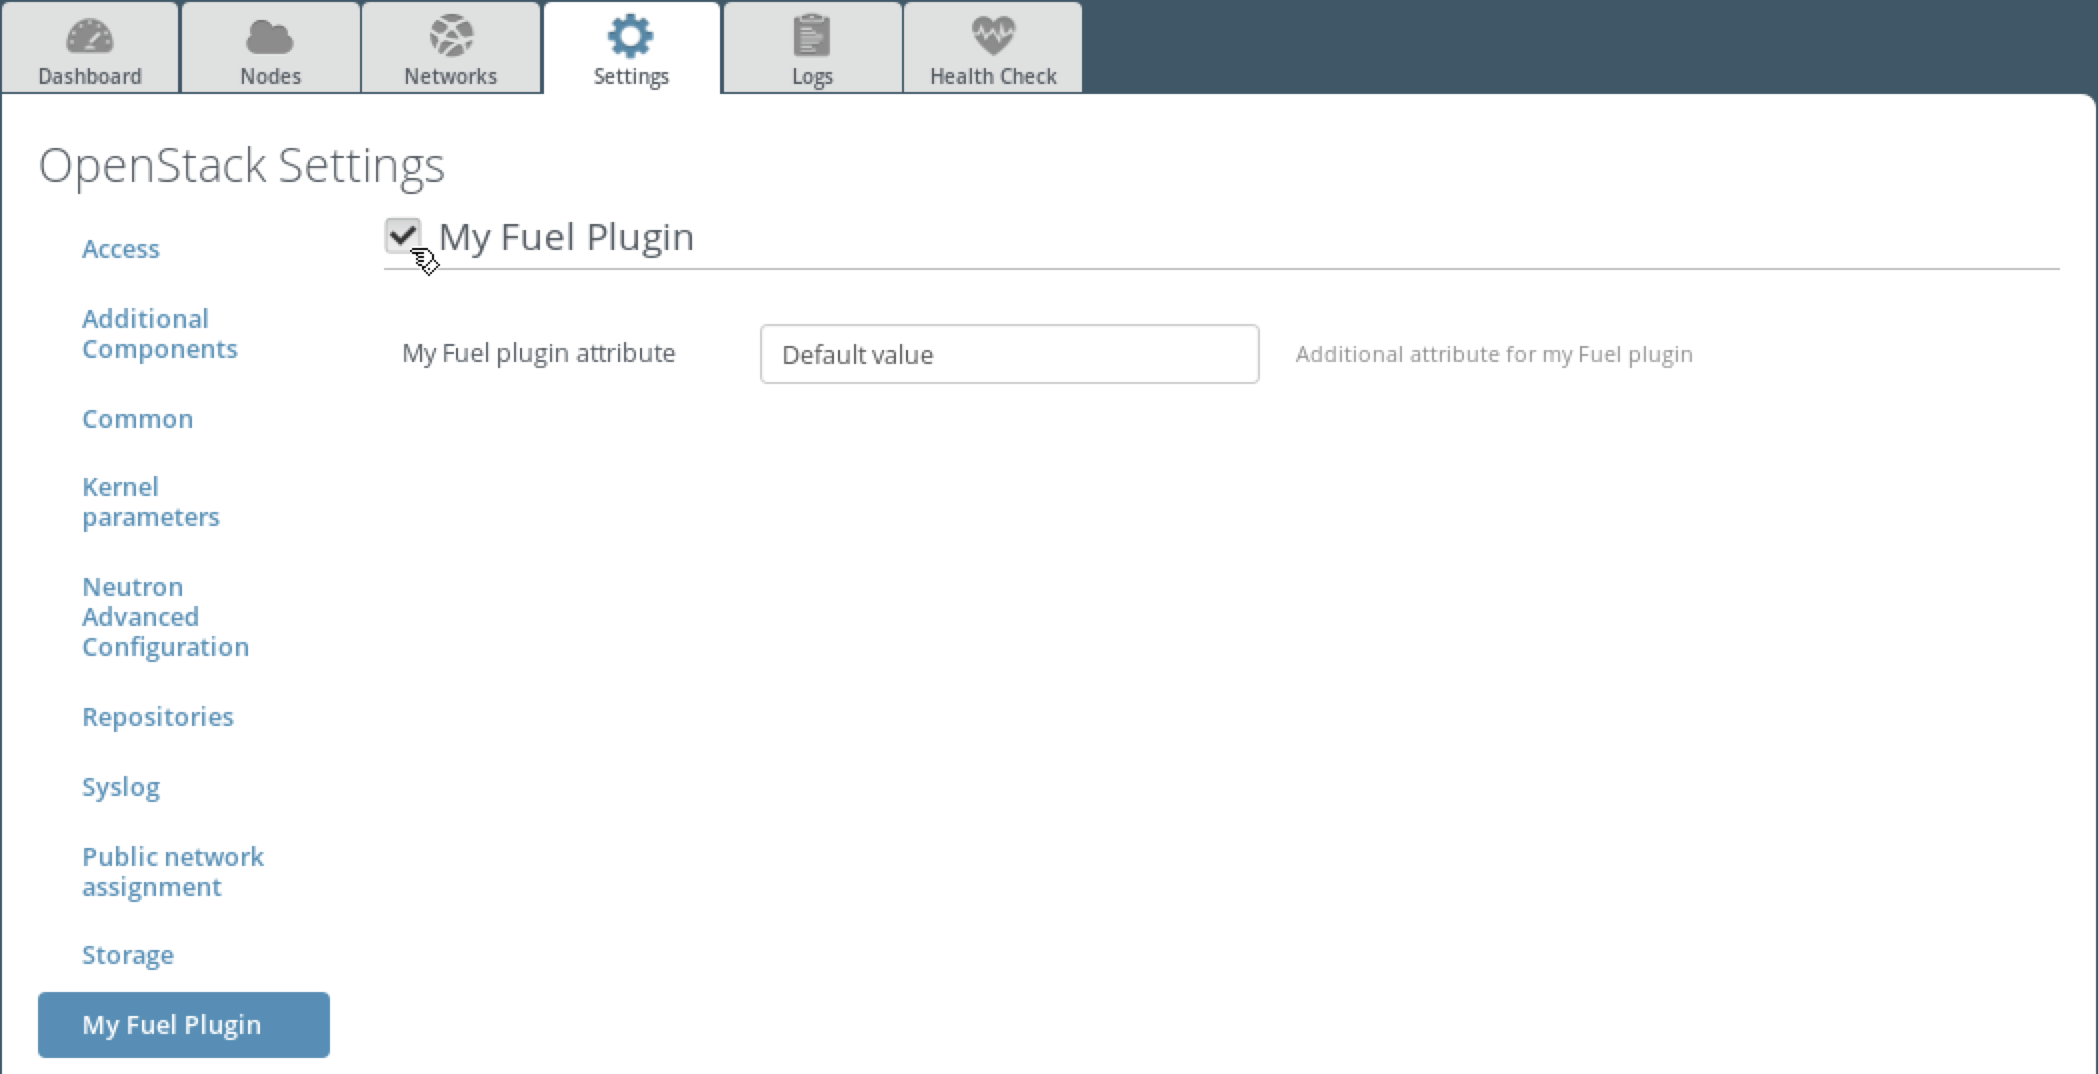
Step 4 Define the plugin’s additional attributes that will appear on the Settings tab of the Fuel UI. When the environment is deployed, these attributes are passed to the task executor so that the data is available in the /etc/astute.yaml file on each target node and can be accessed from your bash or puppet scripts. Edit the myplugin/environment_config.yaml file:
attributes:
  myplugin_text:
    value: 'Default value'
    label: 'My Fuel plugin attribute'
    description: 'Additional attribute for my Fuel plugin'
    weight: 25
    type: "text"
Step 5 Build the plugin. Execute the following command:
[root@fuel ~]# fpb --build myplugin
Fuel Plugin Builder should create the myplugin/myplugin-1.0-1.0.0-1.noarch.rpm file.
Step 6 Install the plugin. Execute the following command:
[root@fuel ~]# fuel plugins --install myplugin/myplugin-1.0-1.0.0-1.noarch.rpm
Step 7 Check that the plugin is available. Log in to Fuel UI, from the main menu choose the Plugins menu item.
8.6. Create OpenStack environment with Fuel plugin
Follow the steps from section 4.3. Create a New Environment.
8.7. Enable the plugin
Choose the newly created OpenStack environment in Fuel UI, then choose the Settings tab. Choose the My Fuel Plugin menu item. Check the My Fuel Plugin checkbox. Then click Save Settings.
8.8. Assign Roles to the Nodes
Follow the steps from section 4.4. Assign Roles to the Nodes.
8.9. Deploy OpenStack environment with Fuel plugin
Follow the steps from section 4.6. Deploy Simple Environment.
8.10. Verify OpenStack environment with Fuel plugin
Step 1 Log in to Fuel Master node as root using r00tme as a password. Execute fuel nodes to see a list of available nodes, their roles and IP addresses.
$ ssh root@10.20.0.2
[root@fuel ~]# fuel nodes
Step 2 Log in to any target node (controller or compute) and check that the file created by the plugin exists:
[root@fuel ~]# ssh 10.20.0.3
[root@node-1 ~]# cat /tmp/myplugin.log
myplugin post deployment task executed
Checkpoint
- Install Fuel Plugins Builder
- Create, build and install a new Fuel plugin
- Create a new OpenStack environment
- Enable the plugin for the newly created OpenStack environment
- Assign roles, including one, defined by plugin, to nodes
- Deploy the OpenStack environment
- Check that the plugin’s deployment tasks have been executed
![]()
Table Of Contents
- 1. Classroom Environment
- 2. Explore HA OpenStack
- 3. Fuel Installation
- 4. Simple Deployment
- 5. HA Deployment
- 6. OpenStack Networking
- 7. Fuel Troubleshooting
- 8. Fuel Plugins
- 8.1. Prerequisites
- 8.2. Delete the Existing OpenStack Environment
- 8.3. Create Controller and Compute Nodes
- 8.4. Install Fuel Plugins Builder
- 8.5. Create and Build Fuel Plugin
- 8.6. Create OpenStack environment with Fuel plugin
- 8.7. Enable the plugin
- 8.8. Assign Roles to the Nodes
- 8.9. Deploy OpenStack environment with Fuel plugin
- 8.10. Verify OpenStack environment with Fuel plugin
- 9. OpenStack with Ceph
- 10. Murano
- 11. Sahara